Authentication Sources
Authentication sources define the source of user information. Each authentication source has two attributes: driver and template, which describe how this authentication source works. Currently, the driver supports the following authentication sources:
| Driver | Template | Description | User or Group Domain | Import Behavior |
|---|---|---|---|---|
| sql | - | User and group definitions come from local SQL database | Any number of domains | No import required |
| ldap | msad_one_domain | User and group definitions come from local Microsoft Active Directory Domain | Single domain | Automatically import one domain and users and groups |
| ldap | msad_multi_domain | User, group, and domain definitions come from local Microsoft Active Directory Domain | Multiple domains | Automatically import multiple domains. One domain corresponds to one OU under domain_dn. Users and groups under OU are imported into corresponding domains. |
| ldap | openldap_one_domain | User and group definitions come from local OpenLDAP or FreeIPA | Single domain | Automatically import one domain, users and groups under user_dn and group_dn |
| ldap | - | User and group definitions come from any LDAP data source | Single or multiple domains | |
| cas | - | Java CAS Server | Single domain | Import on each user login |
| oauth2 | dingtalk | DingTalk Enterprise Authentication | Single domain | Import on each user login |
| oauth2 | feishu | Feishu Enterprise Authentication | Single domain | Import on each user login |
| oauth2 | wecom | WeChat Work SSO Authentication | Single domain | Import on each user login |
| oidc | GitHub | GitHub SSO | Single domain | Import on each user login |
| oidc | Azure | Azure OpenID Connect SSO | Single domain | Import on each user login |
| oidc | dex | Dex OpenID Connect SSO | Single domain | Import on each user login |
| saml | Azure | Azure SAML 2.0 SSO | Single domain | Import on each user login |
Common Commands
View Authentication Sources
climc idp-list --scope system
View Authentication Source Configuration
climc idp-config-show <idp_id>
Edit Authentication Source Configuration
climc idp-config-edit <idp_id>
Enterprise User Usage Process
- Import users to the platform:
- Local users (SQL source): The platform has a built-in SQL source. No configuration is needed at the authentication source. You only need to create or import users in the user list.
- LDAP users: Create an authentication source with LDAP authentication protocol. After configuration is complete, users on the LDAP server will be synchronized to the platform.
- Other authentication sources (authentication sources other than LDAP and SQL authentication protocols): Create authentication sources other than LDAP authentication protocol, and check "Auto-create users". This method does not immediately create users. When users authenticate and log in to the platform through the corresponding authentication source method, users with the same name will be automatically created on the platform.
- Log in to the platform:
- Enterprise users who only have SQL or LDAP authentication protocols configured can only log in to the platform through username and password on the login page.
- When enterprises configure other authentication sources (authentication sources other than LDAP and SQL authentication protocols), there are two situations:
- When configuring other authentication sources, "Auto-create users" is checked. This authentication source can be used as the primary authentication source. Enterprise users can select the corresponding authentication source icon on the login page, authenticate and log in to the platform through the corresponding authentication source method, and automatically create users with the same name on the platform.
- When configuring other authentication sources, "Auto-create users" is not checked. This authentication source serves as an auxiliary authentication source. Local users can associate user information with this authentication source. After successful association, enterprise users can select the corresponding authentication source icon on the login page and authenticate and log in to the platform through the corresponding authentication source method.
- Primary authentication source: This authentication source defines the source of users. SQL and LDAP authentication sources are primary authentication sources by default. Other authentication sources can be used as primary authentication sources when "Auto-create users" is enabled when adding them.
- Auxiliary authentication source: This authentication source is only used as an authentication login method. Users from the primary authentication source need to associate with the auxiliary authentication source first. After successful association, you can use this authentication source to log in to the platform.
Entry: In the cloud management platform, click the navigation menu in the upper left corner, and in the pop-up left menu bar, click the "Authentication & Security/Authentication System/Authentication Sources" menu item to enter the authentication source page.
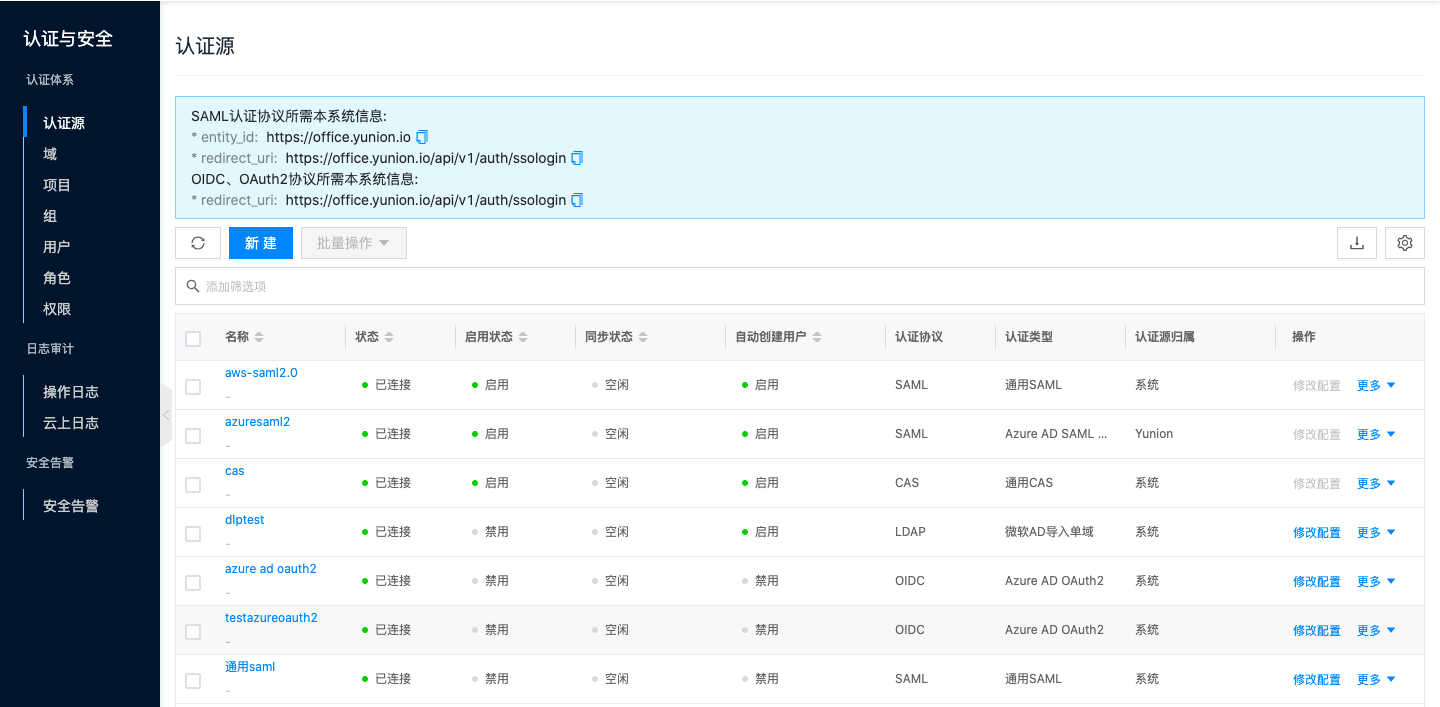
Above the list, EntityID and Redirect_url (callback address) required by SAML protocol and OIDC and OAuth2 protocols will be displayed, and copying is supported.
Create Authentication Source
This function is used to integrate third-party authentication sources.
Create LDAP Protocol Authentication Source
Please ensure that an LDAP server exists in the user environment.
- On the authentication source page, click the "New" button above the list to enter the create authentication source page.
- Configure the following parameters:
- Authentication Source Ownership: Set the ownership scope of the authentication source. When the authentication source belongs to the system, all users in the system can use this authentication source to log in to the platform. When the authentication source belongs to a domain, only users in that domain can use this authentication source to log in to the platform. In the domain management backend, authentication sources belong to the domain administrator's domain.
- Name: Name of the authentication source.
- Authentication Protocol: Select "LDAP".
- Authentication Type: Supports importing single domain from Microsoft Active Directory, importing multiple domains from Microsoft Active Directory, and importing single domain from OpenLDAP/FreeIPA. Configuration parameters for different authentication types are slightly different.
- When the authentication type is Microsoft Active Directory import single domain:
- User Target Domain: Optional. Select the domain to which users on the LDAP server belong in the cloud management platform.
- Server Address: URL address of the AD domain controller server, format is ldap(s)://server IP address, must start with ldap:// or ldaps://.
- Base DN: DN is Distinguished Name. Base DN is the unique name identifier of an entry in the entire directory tree. Format is "DC=xx,DC=com"
- Username: Username for connecting to the AD domain controller server.
- Password: Password corresponding to the user for connecting to the AD domain controller server.
- User DN: User DN is the root path for finding users in the LDAP directory. Users will be recursively searched under this root path. Format is "CN=users,OU=xx,DC=xx,DC=com".
- Group DN: Group DN is the root path for finding groups in the LDAP directory. Groups will be recursively searched under this root path. Format is "CN=groups,OU=xx,DC=xx,DC=com".
- User Enabled Status: Set the status of users imported from the authentication source. When set to enabled, users can log in to this system. When disabled, users cannot log in to the system.
- When the authentication type is Microsoft Active Directory import multiple domains (when the authentication source belongs to a domain, this item is not supported):
- Server address, base DN, username, and password are the same as importing a single domain.
- Domain DN: Domain corresponds to OU (organization unit) in LDAP. Domain DN is the root path for finding domains in LDAP. All domains will be searched under this path. Format is "OU=xx,DC=xx,DC=com".
- User Enabled Status: Set the status of users imported from the authentication source. When set to enabled, users can log in to this system. When disabled, users cannot log in to the system.
- When the authentication type is OpenLDAP/FreeIPA import single domain:
- Target Domain: Optional. Select the domain to which users on the LDAP server belong in the cloud management platform.
- Server Address: URL address of the OpenLDAP or FreeIPA server, format is ldap(s)://server IP address, must start with ldap:// or ldaps://.
- Base DN: DN is Distinguished Name. Base DN is the unique name identifier of an entry in the entire directory tree. Format is "DC=ocdc,DC=com"
- Username: User UID for connecting to the server, format is "UID=admin,CN=users,CN=xx,DC=xx,DC=com".
- Password: Corresponding user password.
- User DN: User DN is the root path for finding users in the LDAP directory. Users will be recursively searched under this root path. Format is "CN=users,OU=xx,DC=xx,DC=com"
- Group DN: Group DN is the root path for finding groups in the LDAP directory. Groups will be recursively searched under this root path. Format is "CN=groups,OU=xx,DC=xx,DC=com"
- User Enabled Status: Set the status of users imported from the authentication source. When set to enabled, users can log in to this system. When disabled, users cannot log in to the system.
- Click the "OK" button to create the authentication source.
Create CAS Authentication Protocol Authentication Source
-
On the authentication source page, click the "New" button above the list to enter the create authentication source page.
-
Configure the following parameters:
- Authentication Source Ownership: Set the ownership scope of the authentication source. When the authentication source belongs to the system, all users in the system can use this authentication source to log in to the platform. When the authentication source belongs to a domain, only users in that domain can use this authentication source to log in to the platform. In the domain management backend, authentication sources belong to the domain administrator's domain.
- Name: Name of the authentication source.
- Authentication Protocol: Select "CAS".
- Authentication Type: Supports generic CAS.
- CAS Service Address: URL address of the CAS single sign-on server, such as http://cas.example.io/cas.
- User ID: Set the user ID attribute corresponding to generic CAS, generally cas:user. Change this if it varies.
- Username: Set the username attribute corresponding to generic CAS, generally cas:user. Change this if it varies.
- Auto-create Users: After checking auto-create users, users who log in through the authentication source for the first time will automatically create a local user in the system. When this item is not checked, this authentication source serves as an auxiliary authentication source. Users need to be associated with this authentication source to log in to the platform through this authentication source.
- User Target Domain: This parameter only needs to be set after checking auto-create users. Select the domain to which users automatically created by logging in through this authentication method belong. When the authentication source belongs to a domain, the user target domain is consistent with the authentication source ownership domain and cannot be changed.
Advanced Configuration: Hidden by default, can be configured as needed.
- Default Project: Set the default project that users who log in through the CAS authentication source and are automatically created on the platform join. When selecting "Prioritize using projects in CAS", you need to specify the field name for joining projects, such as cas:proj, etc. When users log in through CAS, they will have a project field. If the cloud management platform has a matching project, users will be directly added to the corresponding project. If there is no matching project, a project with the same name will be automatically created.
- Default Role: Set the default role that users who log in through the CAS authentication source and are automatically created on the platform join the project with. When selecting "Prioritize using roles in CAS", you need to specify the field name for roles, such as cas:role, etc. When users log in through CAS, they will have a role field name. If the cloud management platform has a matching role, the corresponding role will be directly used to join the project. If there is no matching role, the default role will be used to join the project.
- Display Name: Set the display name field corresponding to generic CAS.
- Email: Set the email field corresponding to generic CAS.
- Mobile Number: Set the mobile number field corresponding to generic CAS.
-
Click the "OK" button to connect to the authentication source and synchronize domain, group, and user information on the authentication source.
Create SAML Authentication Protocol Authentication Source
-
On the authentication source page, click the "New" button above the list to enter the create authentication source page.
-
Configure the following parameters:
- Authentication Source Ownership: Set the ownership scope of the authentication source. When the authentication source belongs to the system, all users in the system can use this authentication source to log in to the platform. When the authentication source belongs to a domain, only users in that domain can use this authentication source to log in to the platform. In the domain management backend, authentication sources belong to the domain administrator's domain.
- Name: Name of the authentication source.
- Authentication Protocol: Select "SAML".
- Authentication Type: Supports generic SAML and Azure AD SAML2.0. Different types support different parameters.
- When the authentication type is generic SAML, for parameter acquisition methods, please refer to Generic SAML Parameter Acquisition Methods
- Supports uploading SAML IDP metadata files or manual form entry.
- User ID: Set the user ID attribute corresponding to generic SAML.
- Username: Set the username attribute corresponding to generic SAML.
- When the authentication type is Azure AD SAML2.0, only TenantId needs to be configured. For parameter acquisition methods, please refer to Azure AD SAML2.0 Parameter Acquisition Methods
- User Target Domain: This parameter only needs to be set after checking auto-create users. Select the domain to which users automatically created by logging in through this authentication method belong. When the authentication source belongs to a domain, the user target domain is consistent with the authentication source ownership domain and cannot be changed.
Advanced Configuration: Hidden by default, can be configured as needed.
- Default Project: Set the default project that users who log in through SAML authentication protocol authentication source and are automatically created on the platform join.
- Default Role: Set the default role that users who log in through SAML authentication protocol authentication source and are automatically created on the platform join.
Generic SAML Parameter Acquisition Methods
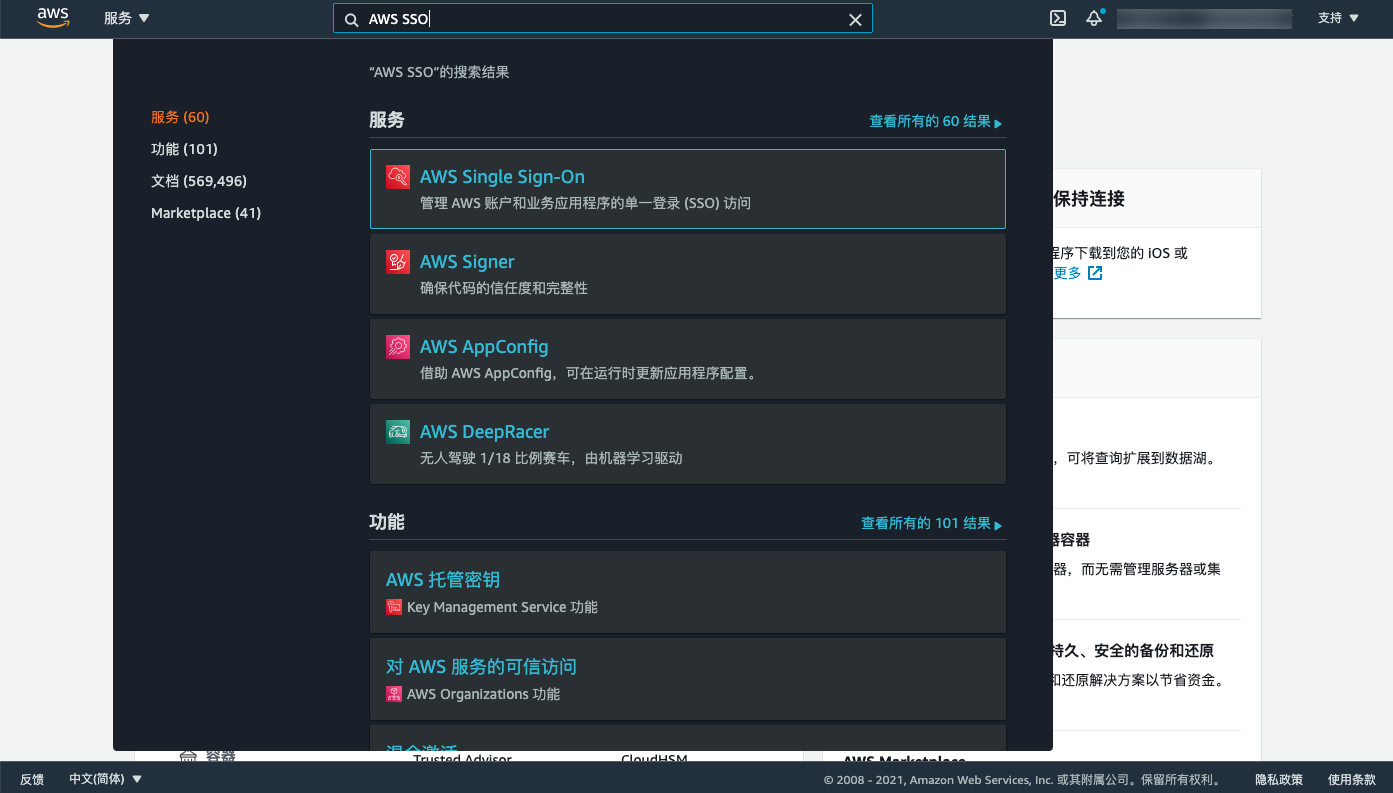
Using AWS SSO as the platform's SAML IDP. Currently, only AWS international regions support AWS SSO.
-
Search for "AWS SSO" on the AWS platform and enter the "AWS Single Sign-On" page.
-
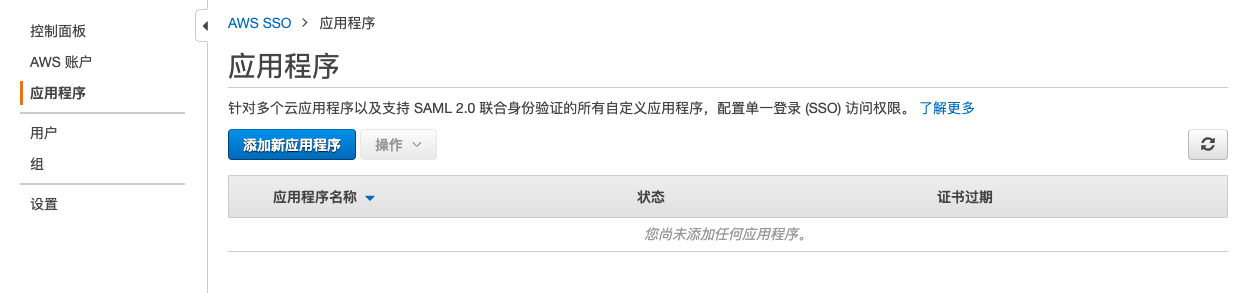
Add a new application in AWS SSO - Applications.
-
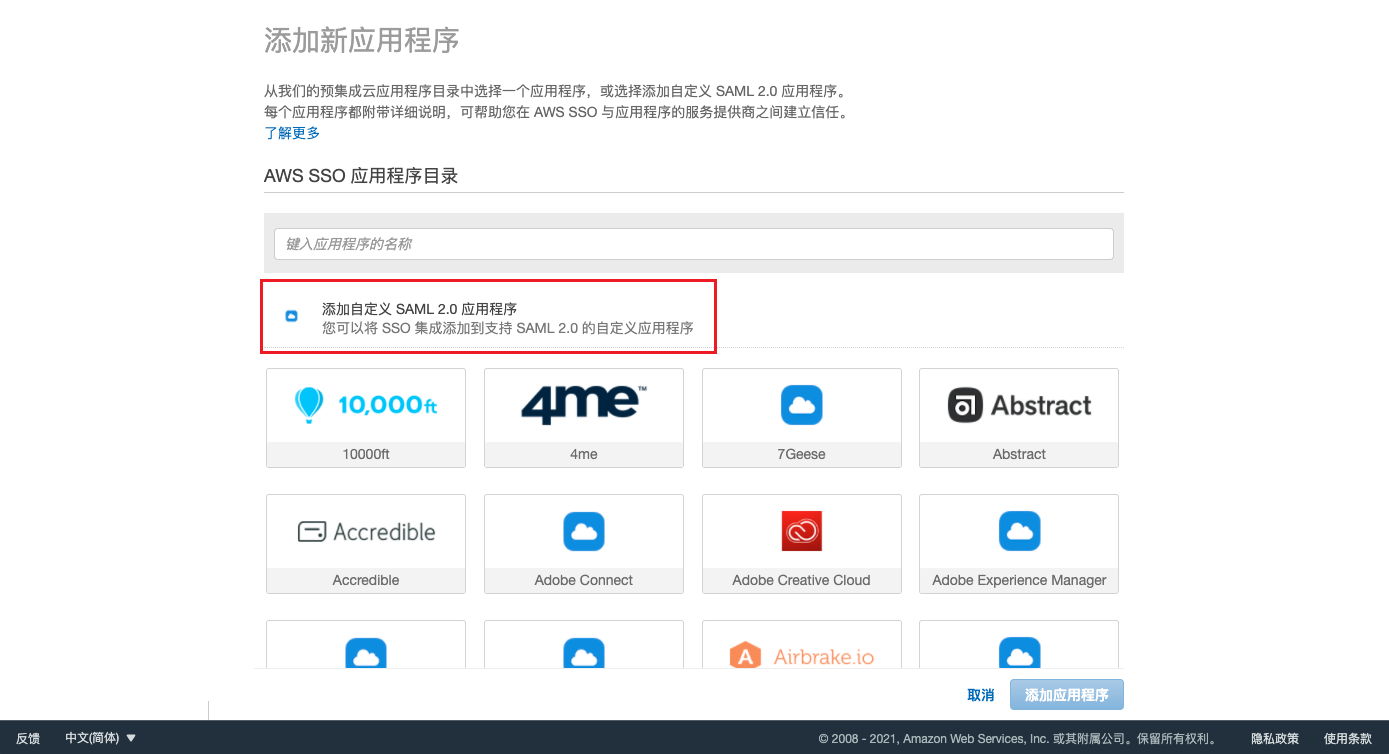
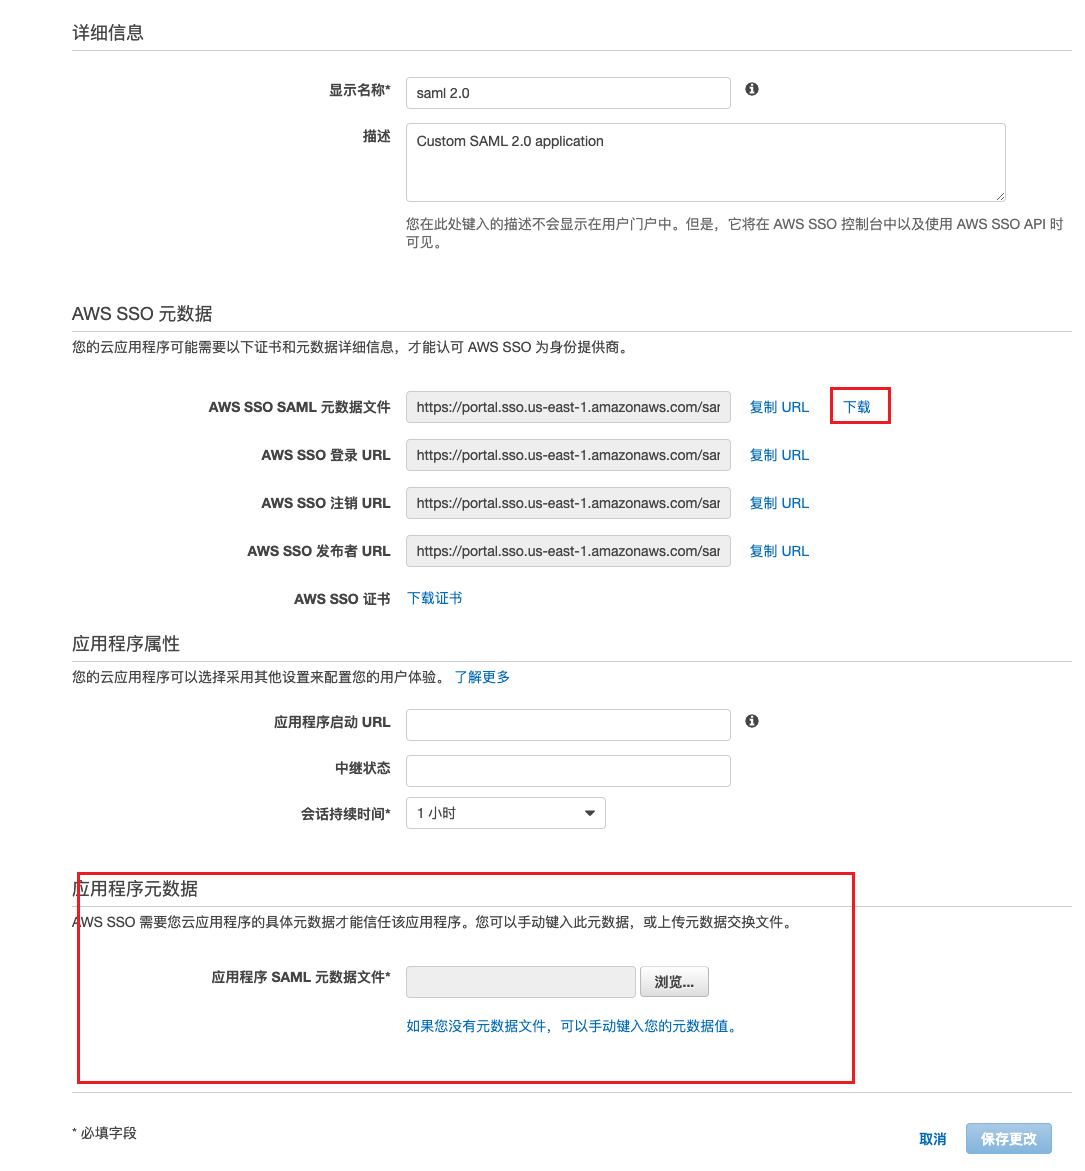
Select "Add Custom SAML 2.0 Application" and enter the "Configure Custom SAML 2.0 application" page.
-
Download the AWS SSO SAML metadata file. This file is the XML file required for "SAML IDP metadata" when configuring generic SAML on the platform.
-
In application metadata, choose to upload metadata file or manually enter metadata values.
-
SAML metadata file acquisition method:
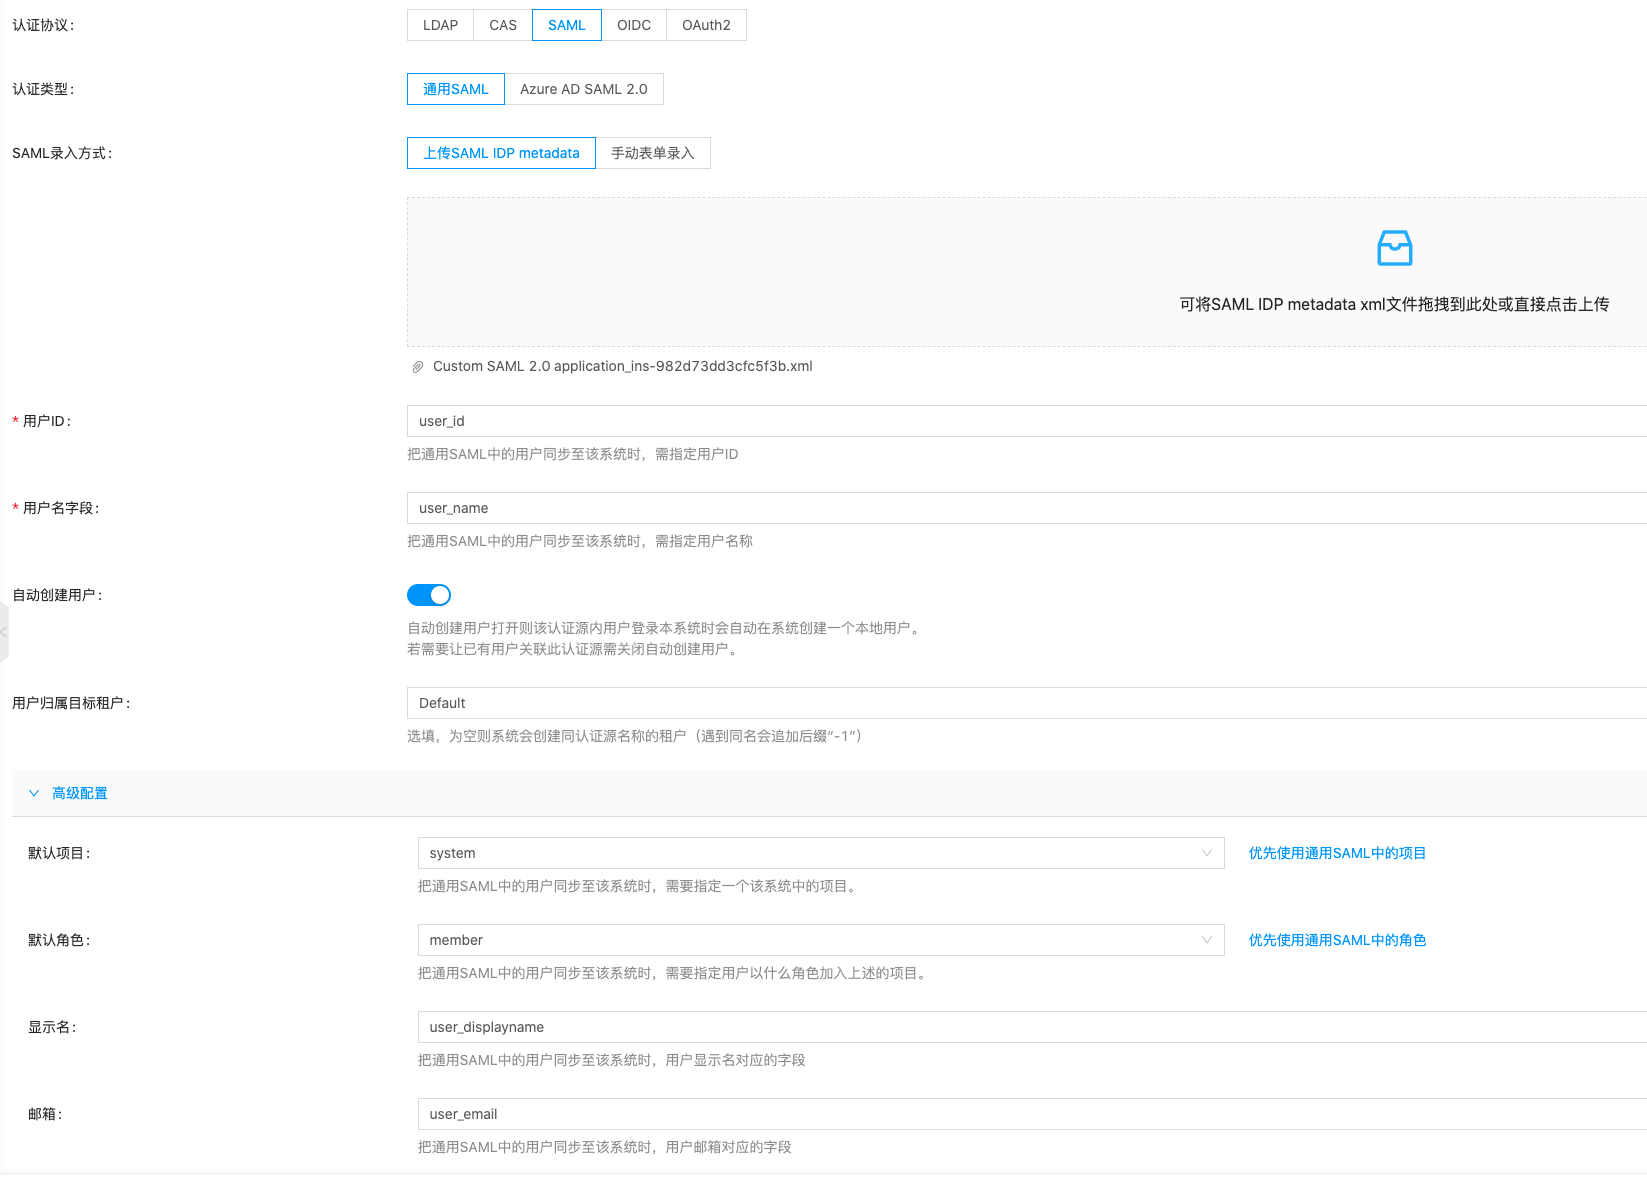
- Create a new authentication source on the platform, select "SAML" for authentication protocol and "Generic SAML" for authentication type.
- Select "Upload SAML IDP metadata" for SAML entry method, and upload the AWS SSO SAML metadata file downloaded from AWS.
- User ID, Username: Set user attributes for user ID and username, such as user_id, user_name. At the same time, you need to map the application attributes of the application to user attributes in AWS SSO in the attribute mapping tab of the AWS SAML application.
- It is recommended to check "Auto-create users" and select the domain, project, role, etc. to which users belong.
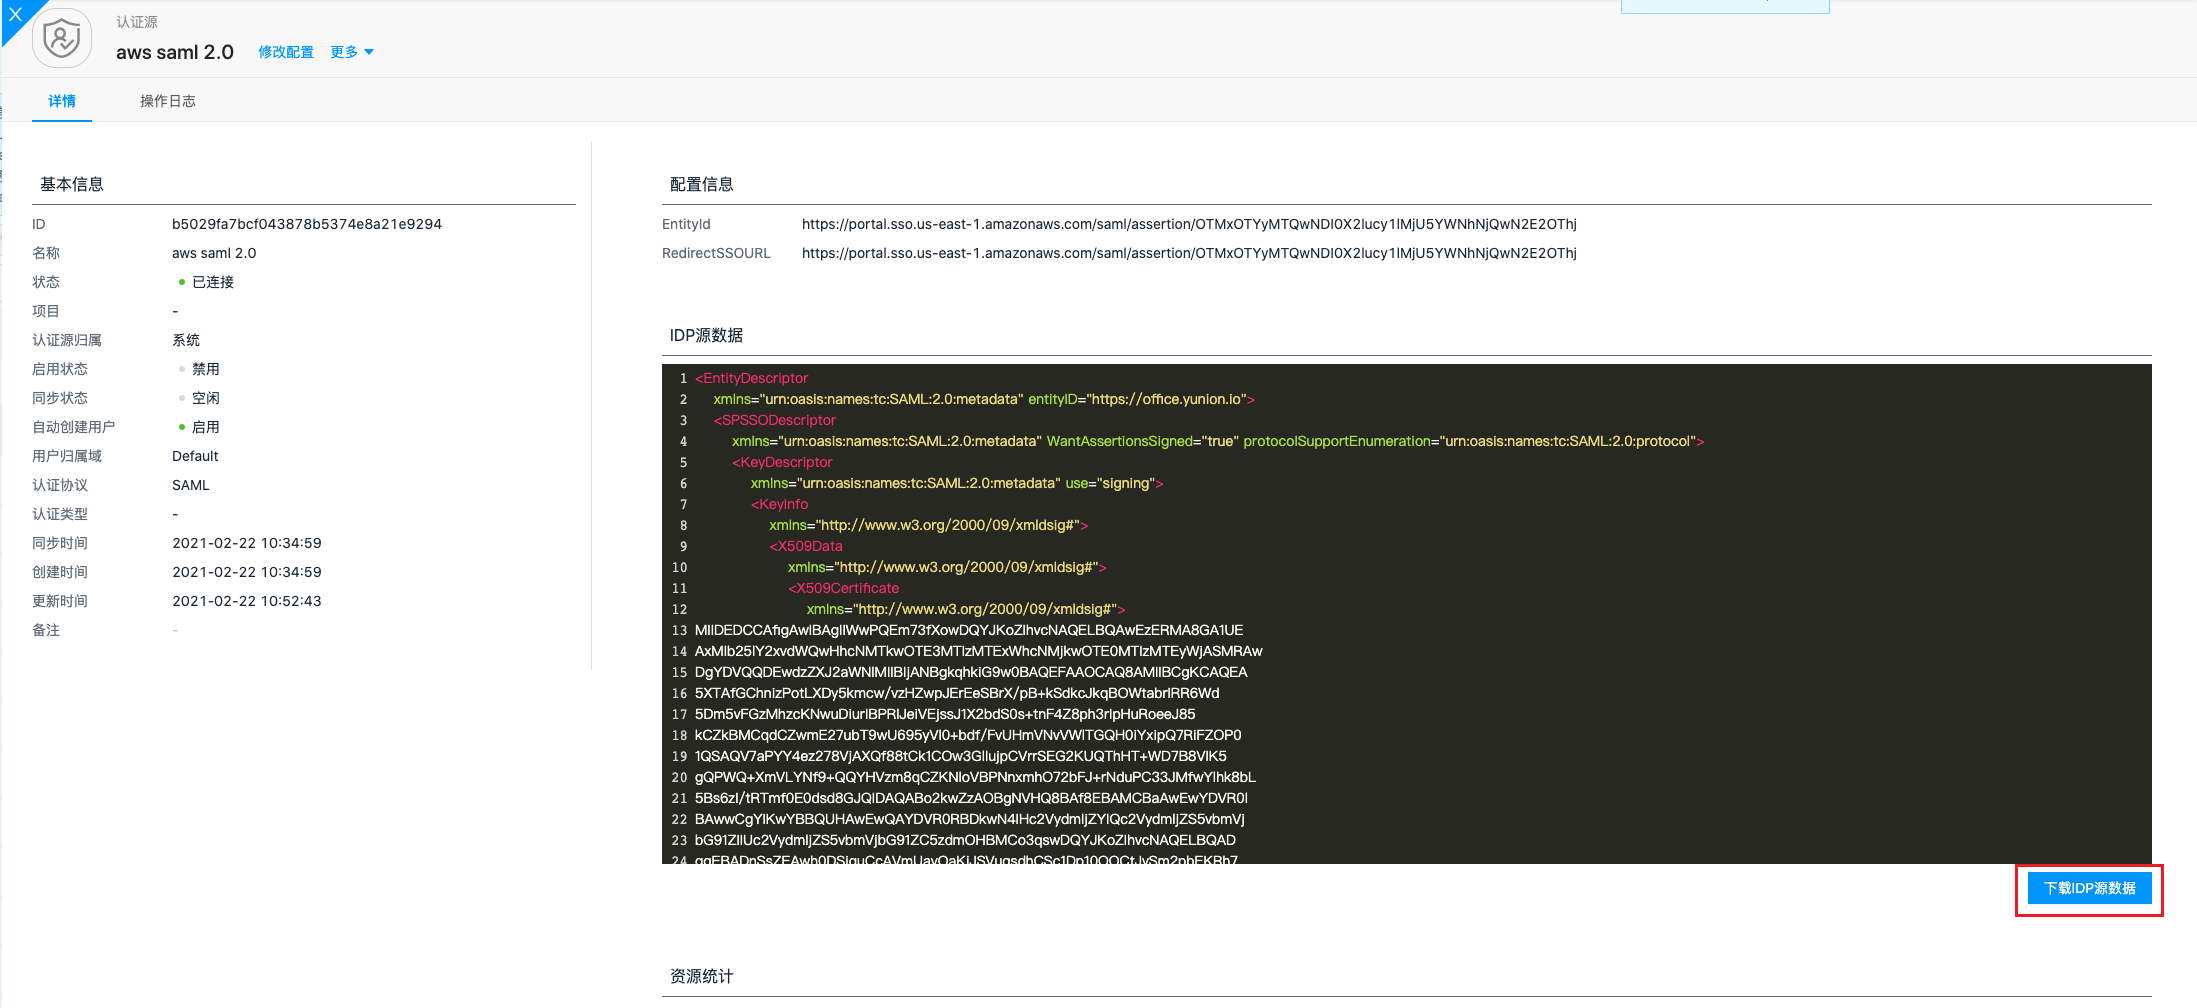
- After creation is complete, in the generic SAML authentication source details, download the IDP source data. This file is the metadata file required for AWS to configure the SAML application.
-
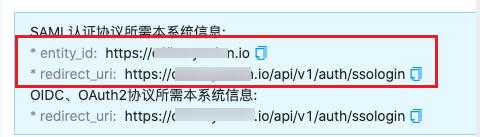
SAML metadata value acquisition method: On the platform's authentication source page, view the redirect_uri in "SAML Authentication Protocol Required System Information", which is the application ACS URL; entity_id is the application SAML audience.

-
-
After configuration is complete, save changes.
-
In application details - Attribute Mapping, configure the following information and click the "Save Changes" button.

-
In application details - Assigned Users, add specified users and groups. Added users can access the application through AWS SAML.
Azure AD SAML2.0 Parameter Acquisition Methods
Only Azure global region accounts are supported.
-
User logs in to Azure.
-
Create a new application in "Azure Active Directory - Enterprise Applications - All Applications".
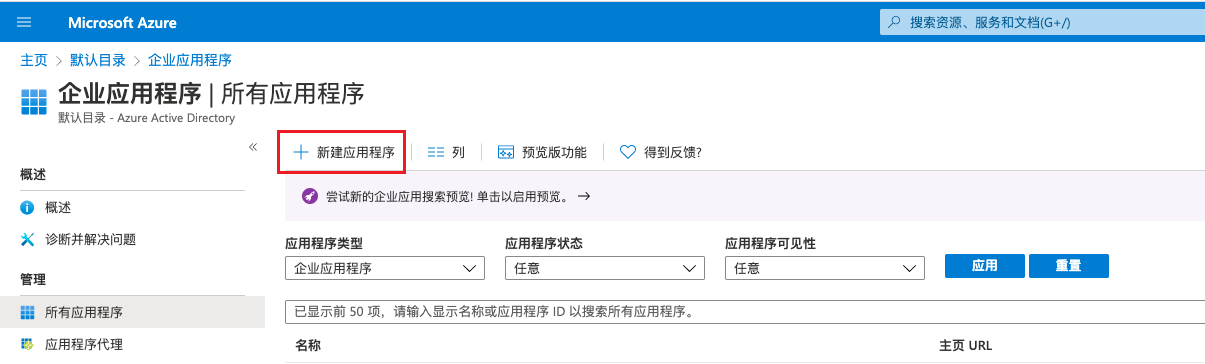
-
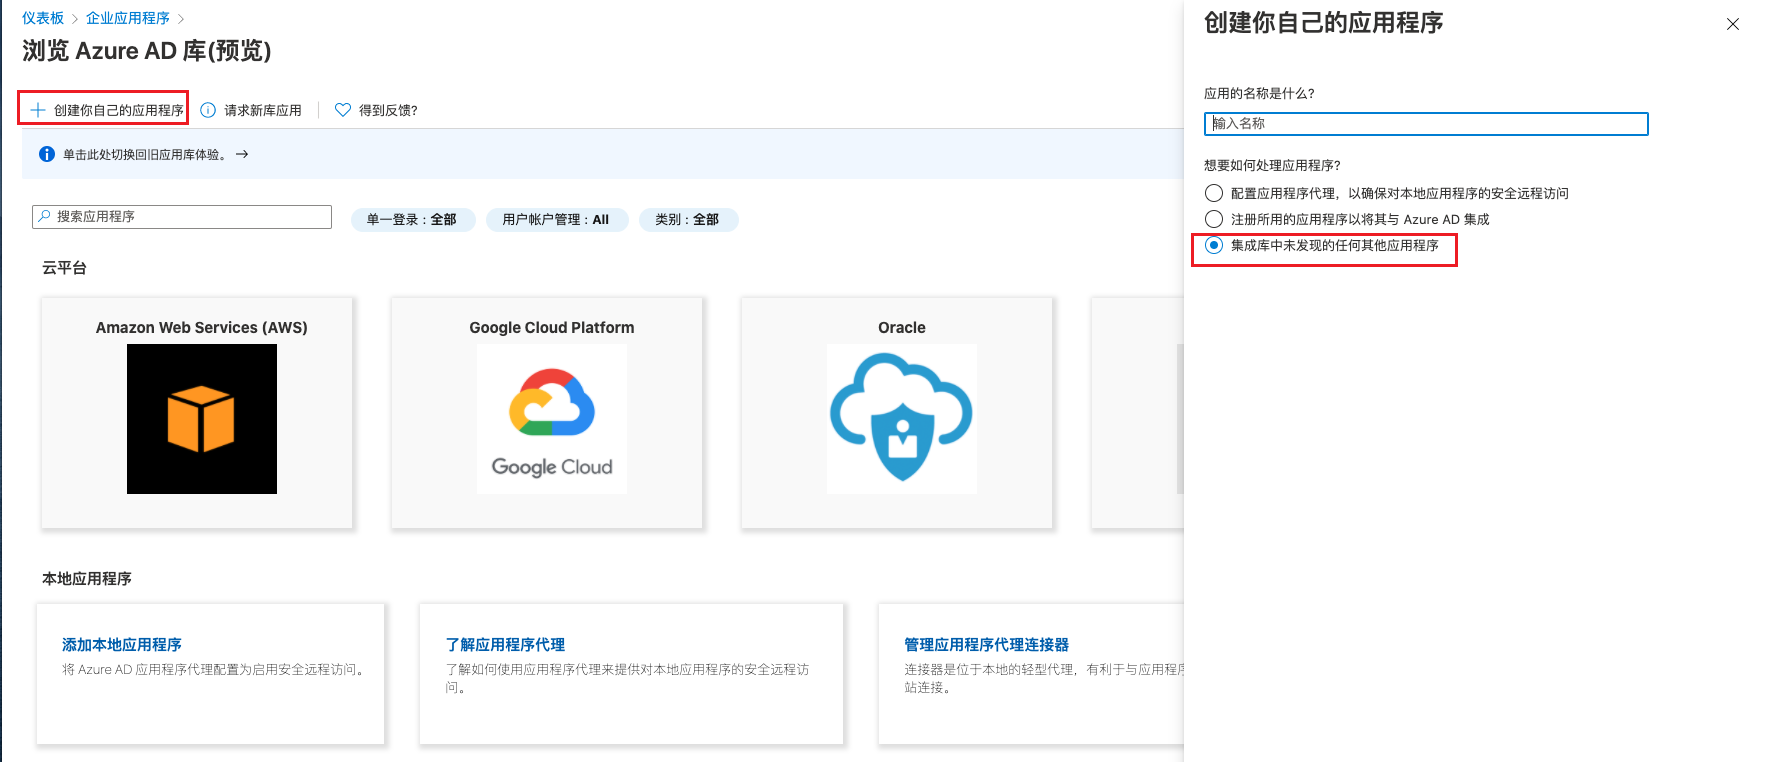
After clicking "Create Your Own Application" , set the application name in the pop-up dialog, select "Any Other Application Not Found in the Integration Library" , and click the "Create" button.
-
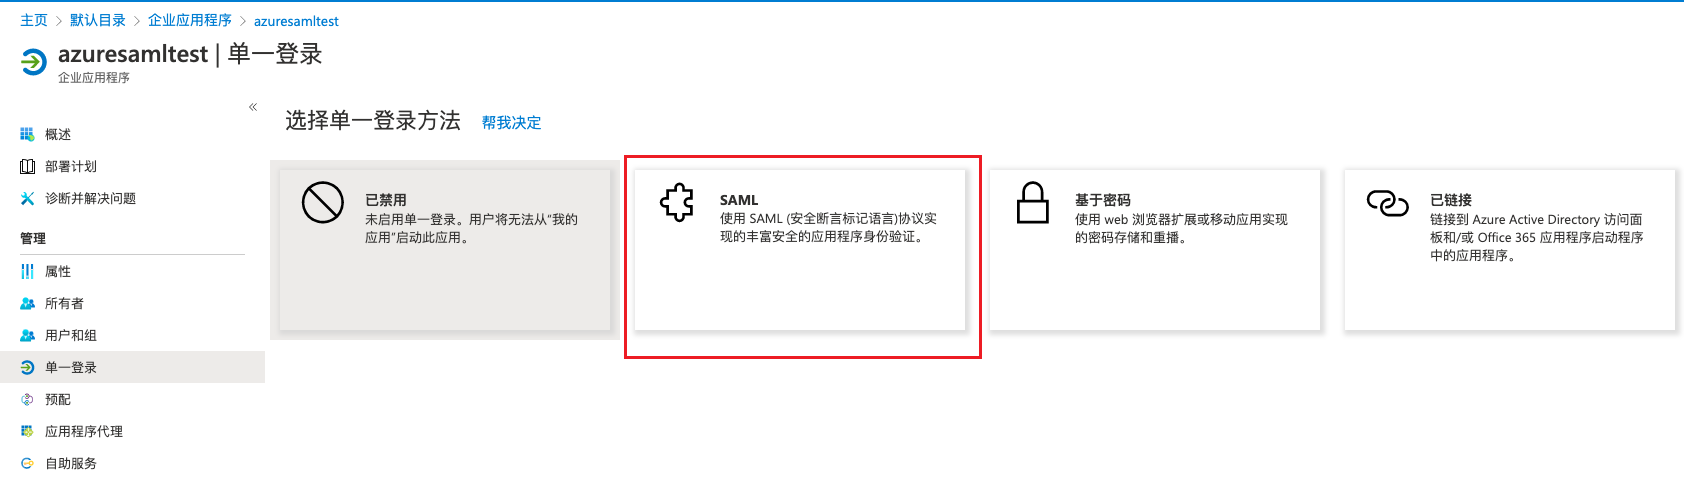
After successful creation, enter the application details page. On the single sign-on page, select "SAML" .
-
On the Configure SAML Single Sign-On page, configure the identifier ID and reply URL.
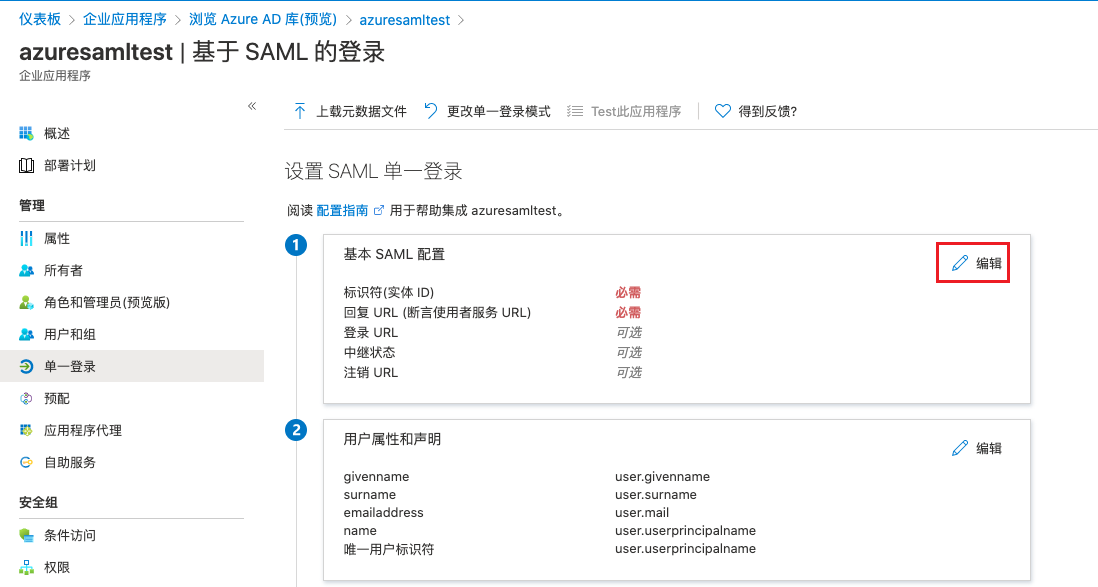
You can view the platform's callback address and identifier ID on the platform authentication source page.
-
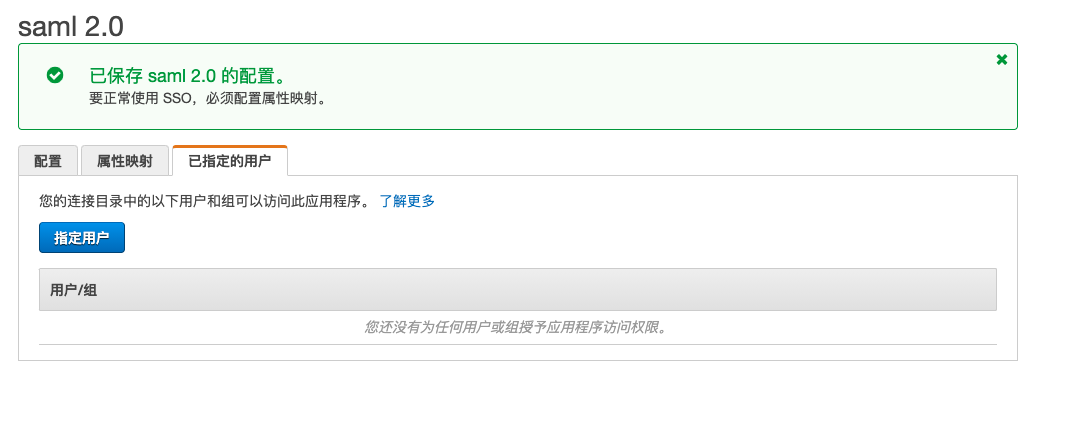
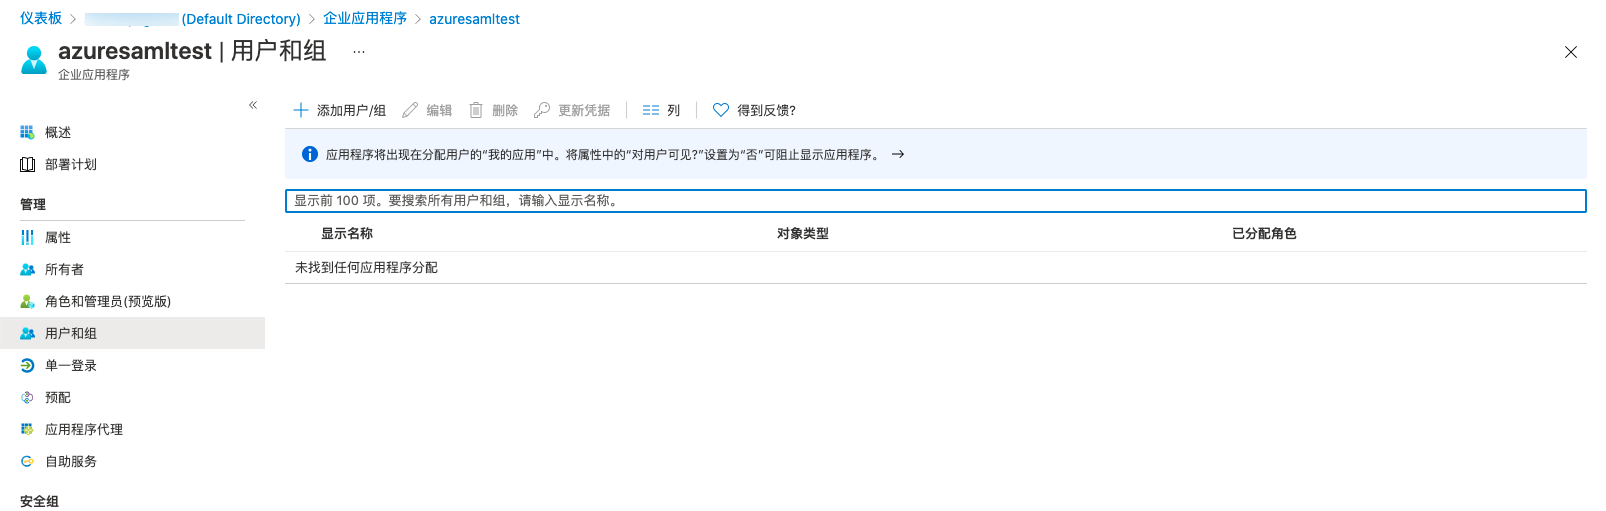
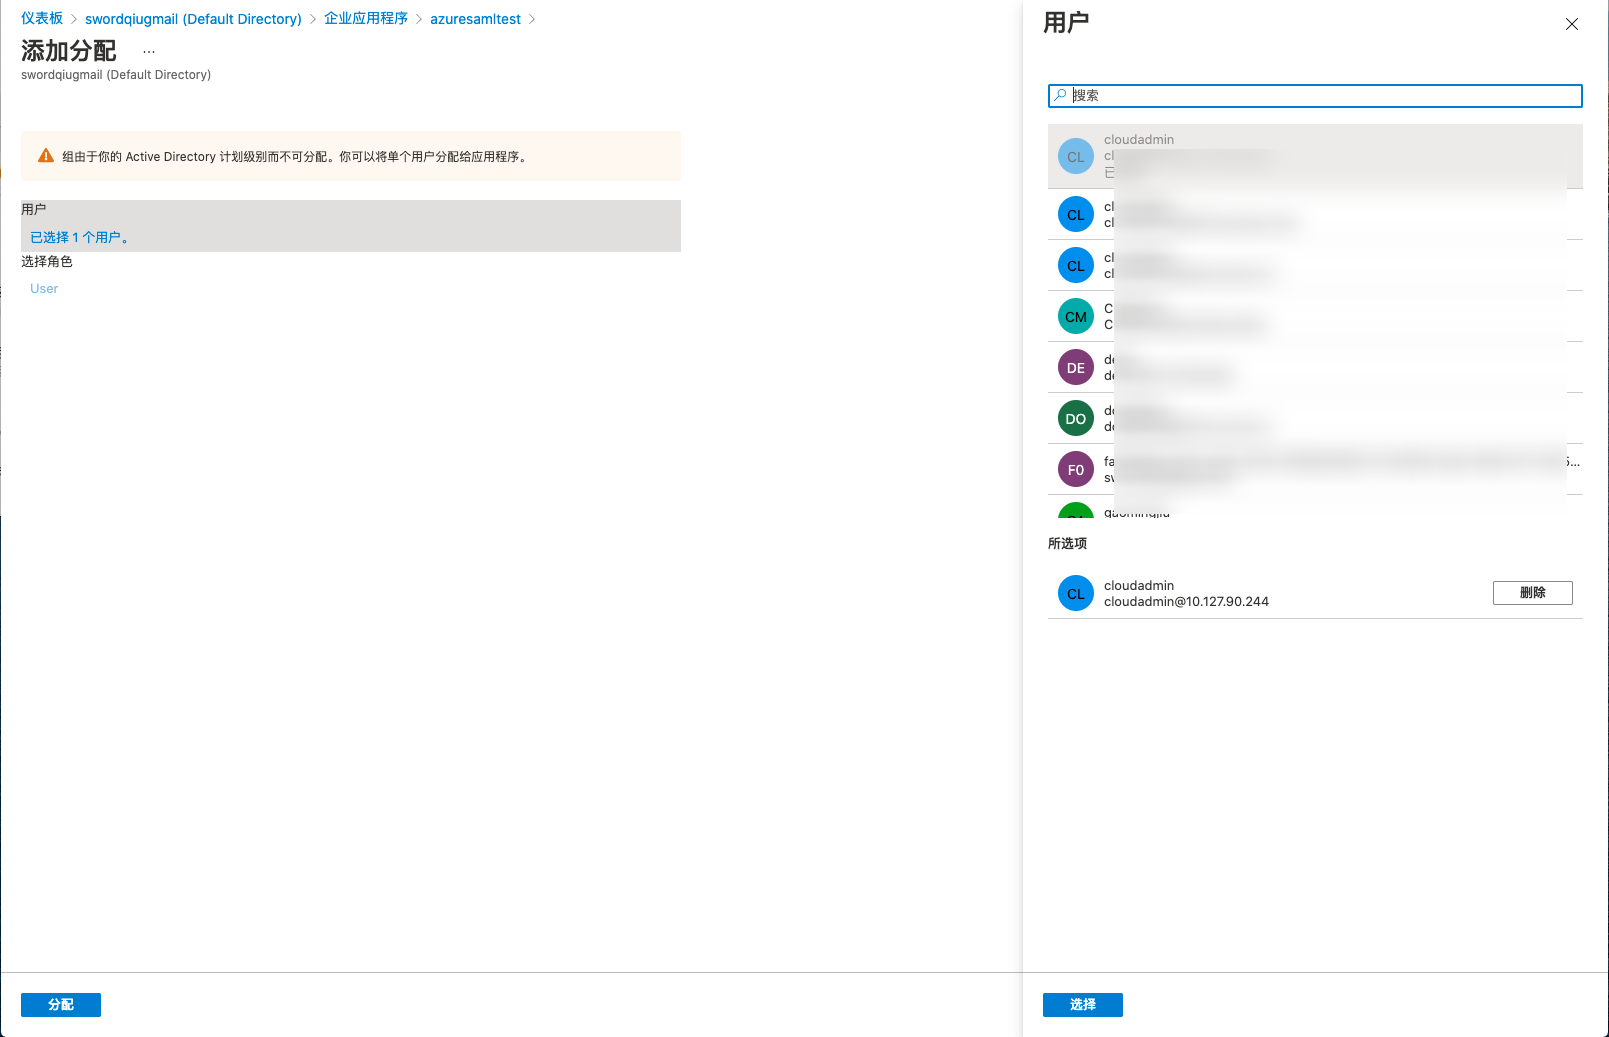
In application details - Users and Groups page, click the "Add User/Group" button to enter the add assignment page.
-
After selecting the corresponding user, click the "Assign" button to add users who need to log in to the platform through the Azure SAML authentication source to the application.
-
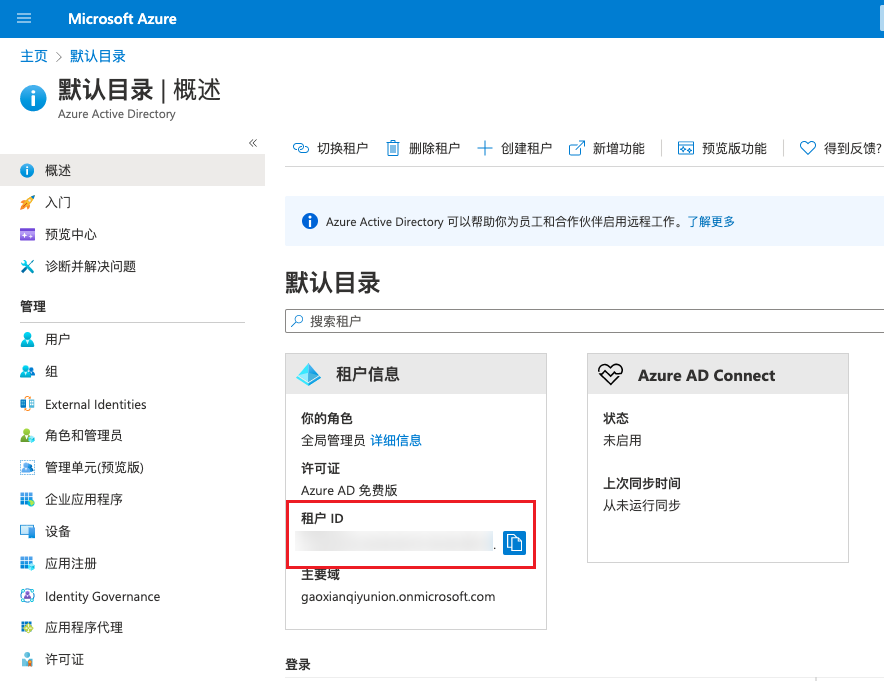
On the Azure Active Directory - Overview page, you can obtain the TenantID (tenant ID).
Create OIDC Authentication Protocol Authentication Source
-
On the authentication source page, click the "New" button above the list to enter the create authentication source page.
-
Configure the following parameters:
- Authentication Source Ownership: Set the ownership scope of the authentication source. When the authentication source belongs to the system, all users in the system can use this authentication source to log in to the platform. When the authentication source belongs to a domain, only users in that domain can use this authentication source to log in to the platform. In the domain management backend, authentication sources belong to the domain administrator's domain.
- Name: Name of the authentication source.
- Authentication Protocol: Select "OIDC".
- Authentication Type: Supports generic OIDC, Github, Azure AD OAuth2. Different authentication types have different configuration parameters.
- When the authentication type is generic OIDC: This function requires an OIDC server in the user environment.
- ClientID: An identifier ID for a third-party application. This information is usually public information used to distinguish which third-party application.
- ClientSecret: Private key information for a third-party application. This information is confidential and not allowed to be passed in the OAuth2 flow, used for security detection and encryption.
- Endpoint: Endpoint contains all configuration information required by the OIDC protocol. If Endpoint information exists, you can directly check "I have Endpoint" and fill in the information. If Endpoint information does not exist, you need to fill in Scopes (authorization scope), AuthUrl, TokenUrl, UserinfoUrl.
- User ID: Set the user ID attribute corresponding to generic OIDC, generally name. Change this if it varies.
- Username: Set the username attribute corresponding to generic OIDC, generally name. Change this if it varies.
- When the authentication type is Github, ClientID and ClientSecret need to be configured. For parameter acquisition methods, please refer to Github Parameter Acquisition Methods
- When the authentication type is Azure AD OAuth2, you need to select Azure's CloudEnv (China region or global region), configure ClientID, ClientSecret, TenantID, etc. For parameter acquisition methods, please refer to Azure AD OAuth2 Parameter Acquisition Methods
- User Target Domain: This parameter only needs to be set after checking auto-create users. Select the domain to which users automatically created by logging in through this authentication method belong. When the authentication source belongs to a domain, the user target domain is consistent with the authentication source ownership domain and cannot be changed.
Advanced Configuration: Hidden by default, can be configured as needed.
- Default Project: Set the default project that users who log in through OIDC authentication protocol authentication source and are automatically created on the platform join.
- Default Role: Set the default role that users who log in through OIDC authentication protocol authentication source and are automatically created on the platform join.
Github Parameter Acquisition Methods
-
User logs in to Github
-
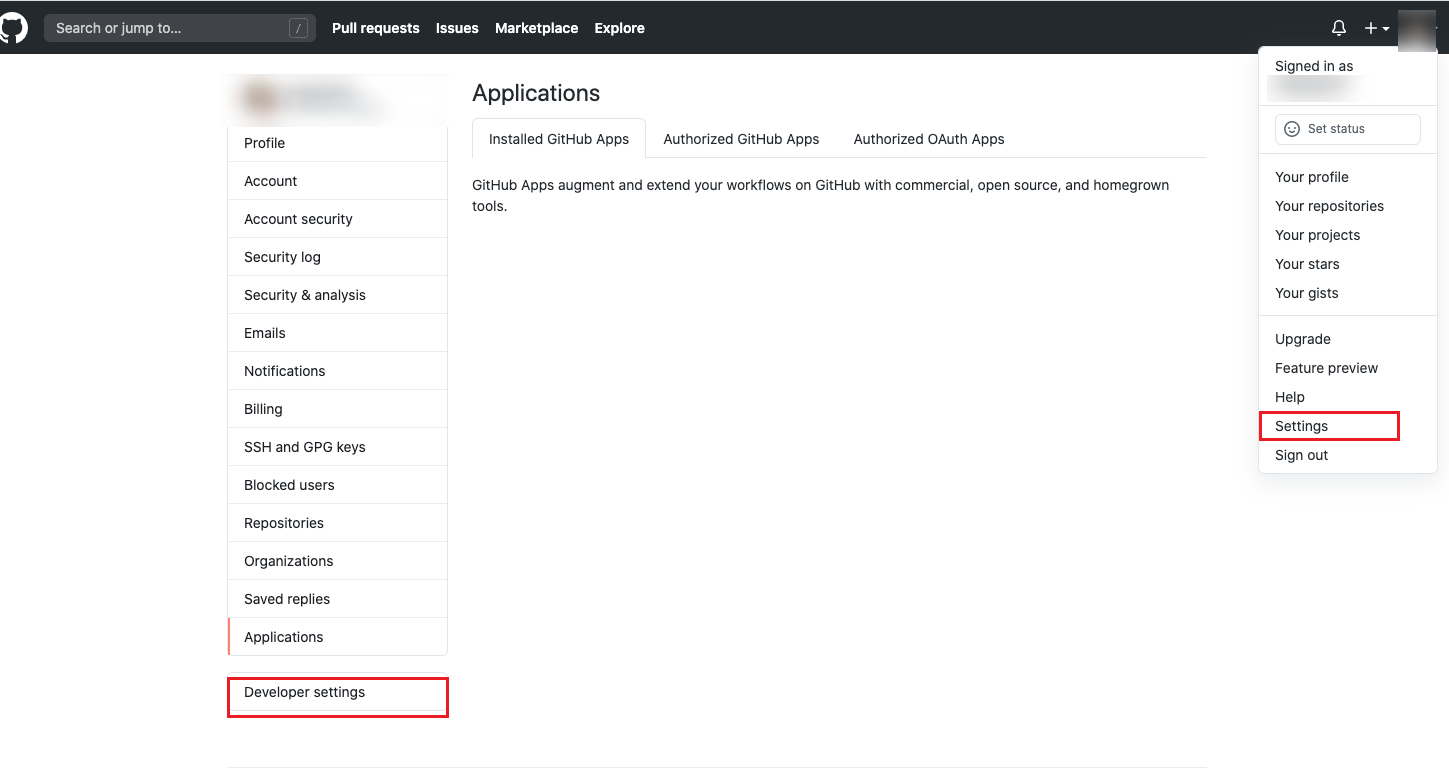
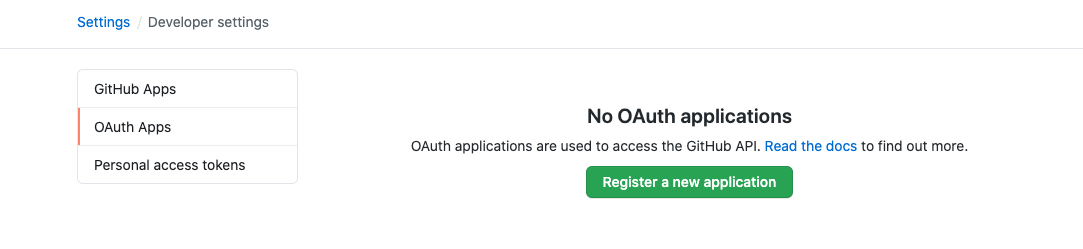
Create an OAuth application on the user information - setting - Developer setting - OAuth2 Apps page.
-
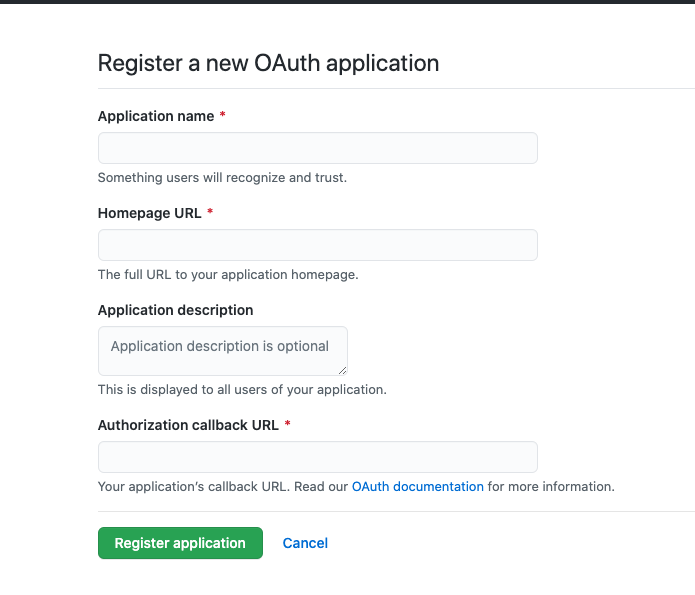
Configure the platform's access address and callback address as "https://<domain>/api/v1/auth/ssologin".
- Set the platform to domain access, and set the access domain in Global Settings - Console Address.
- You can view the platform's callback address on the platform authentication source page.
-
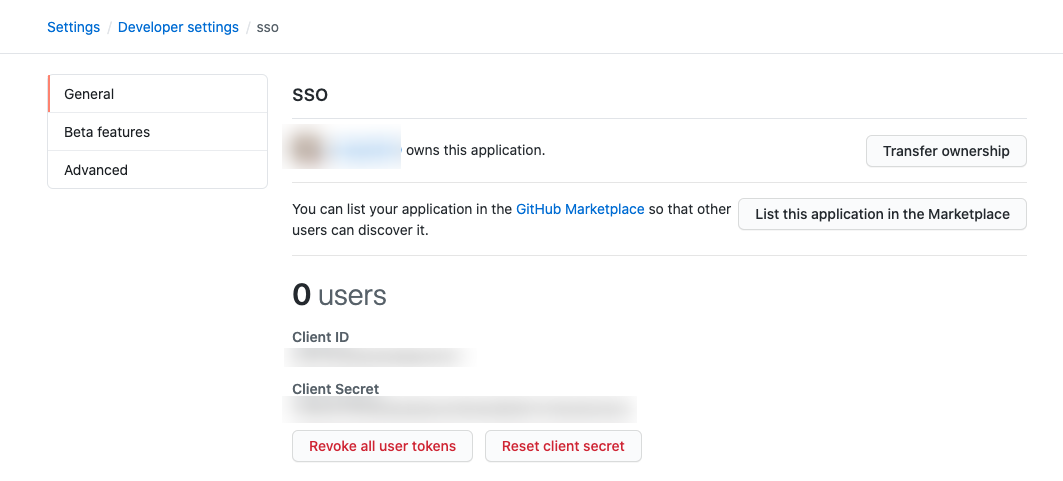
After successful creation, obtain ClientID and ClientSecret.
Azure AD OAuth2 Parameter Acquisition Methods
-
User logs in to Azure China Region or Azure Overseas Region. Using Azure China Region as an example to introduce how to obtain parameters.
-
On the Azure Active Directory - App Registration page, register a new application.
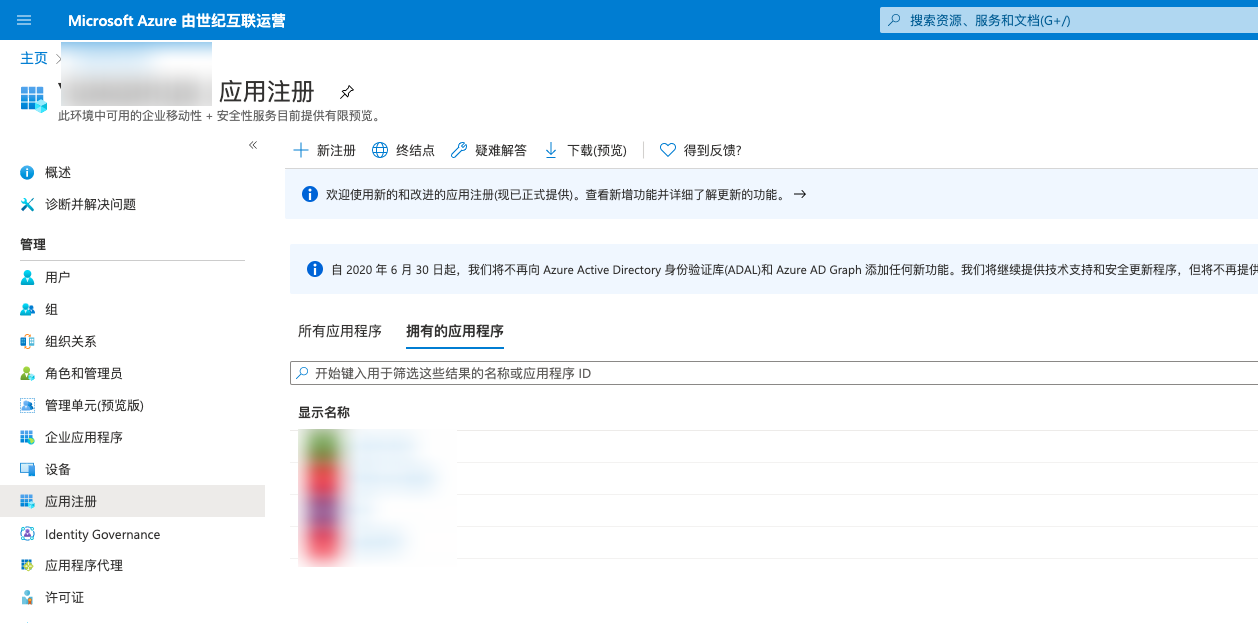
-
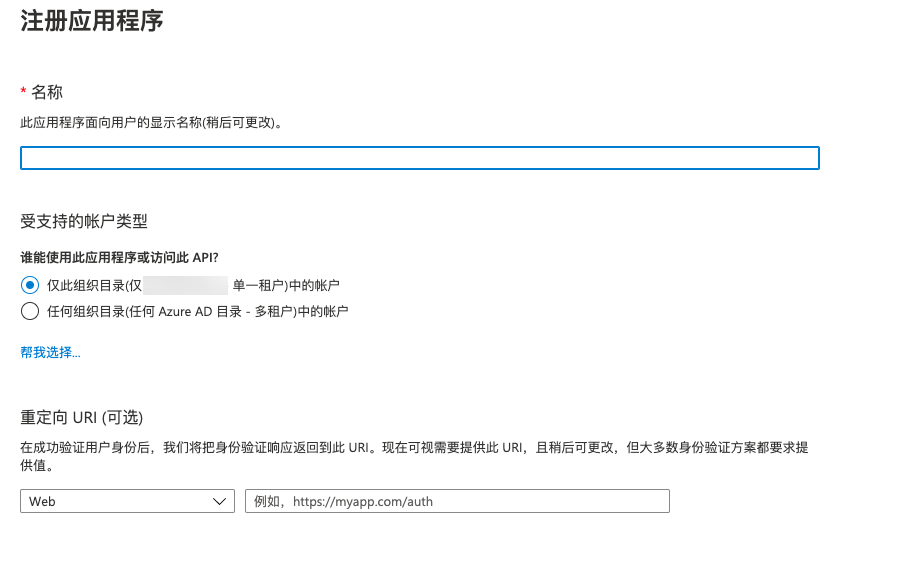
Select the supported account type according to requirements, configure the redirect URI, set it to "web" and the platform callback address to "https://<domain>/api/v1/auth/ssologin".
- Set the platform to domain access, and set the access domain in Global Settings - Console Address.
- You can view the platform's callback address on the platform authentication source page.
-
After successful creation, you will enter the application details page by default. Obtain ClientID (client ID) and TenantID (directory/tenant ID).

-
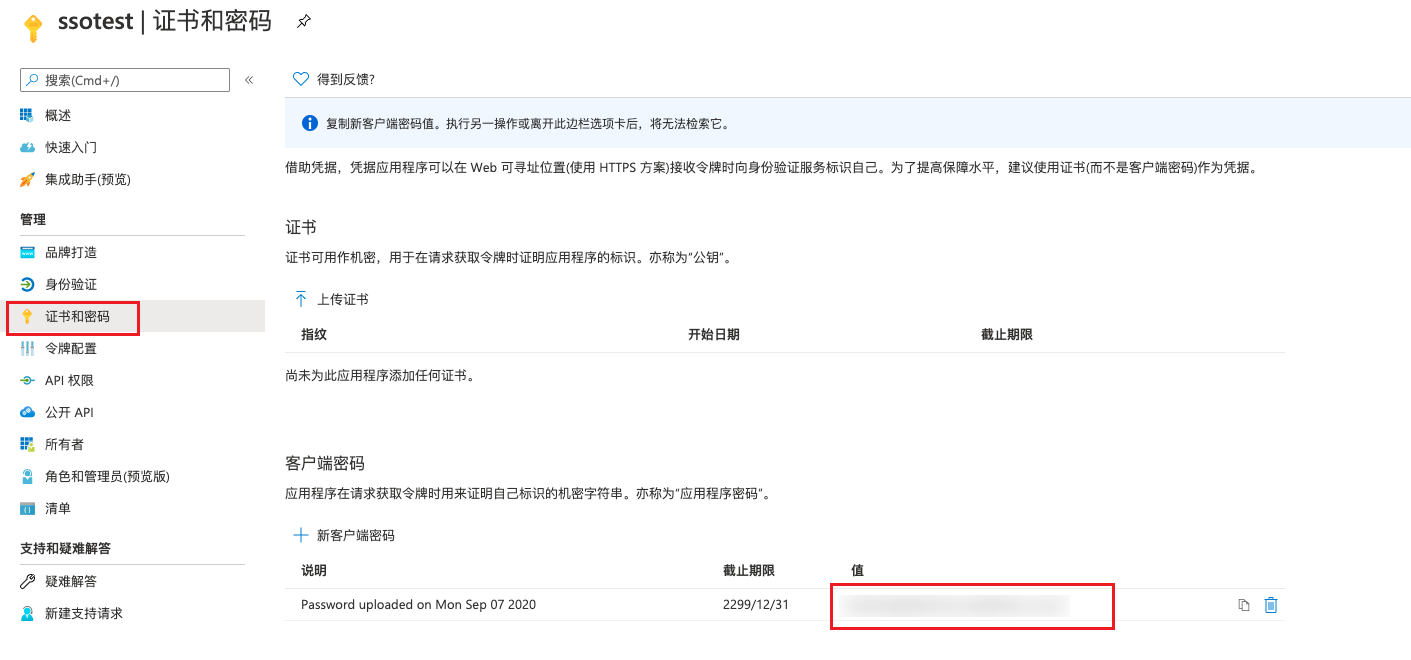
In the left menu items, select the Certificates and Secrets menu item, create a new client secret, and after successful addition, obtain ClientSecret (client secret).
Create OAuth2 Authentication Protocol Authentication Source
-
On the authentication source page, click the "New" button above the list to enter the create authentication source page.
-
Configure the following parameters:
- Authentication Source Ownership: Set the ownership scope of the authentication source. When the authentication source belongs to the system, all users in the system can use this authentication source to log in to the platform. When the authentication source belongs to a domain, only users in that domain can use this authentication source to log in to the platform. In the domain management backend, authentication sources belong to the domain administrator's domain.
- Name: Name of the authentication source.
- Authentication Protocol: Select "OAuth2".
- Authentication Type: Supports Feishu, DingTalk, WeChat Work, etc.
- When the authentication type is Feishu:
- AppId: Application ID identifier. For acquisition methods, please refer to Feishu Parameter Acquisition Methods
- Secret: Application secret, generated by the Feishu open platform when creating the app.
- When the authentication type is DingTalk:
- AppId: Application ID identifier. For acquisition methods, please refer to DingTalk Parameter Acquisition Methods
- AppSecret: Application secret, generated by the DingTalk open platform when creating the QR code login application authorization.
- When the authentication type is WeChat Work:
- Enterprise ID: Used to identify the enterprise. For acquisition methods, please refer to WeChat Work Parameter Acquisition Methods
- AgentID: Application ID identifier.
- Secret: Application secret.
- User Target Domain: This parameter only needs to be set after checking auto-create users. Select the domain to which users automatically created by logging in through this authentication method belong. When the authentication source belongs to a domain, the user target domain is consistent with the authentication source ownership domain and cannot be changed.
Advanced Configuration: Hidden by default, can be configured as needed.
- Default Project: Set the default project that users who log in through OAuth2 authentication protocol authentication source and are automatically created on the platform join.
- Default Role: Set the default role that users who log in through OAuth2 authentication protocol authentication source and are automatically created on the platform join.
Feishu Parameter Acquisition Methods
For more content, please refer to Feishu Official Documentation
-
Enterprise users (no administrator user required) log in to the Feishu Open Platform .
-
On the My Applications page, create an enterprise self-built application.
-
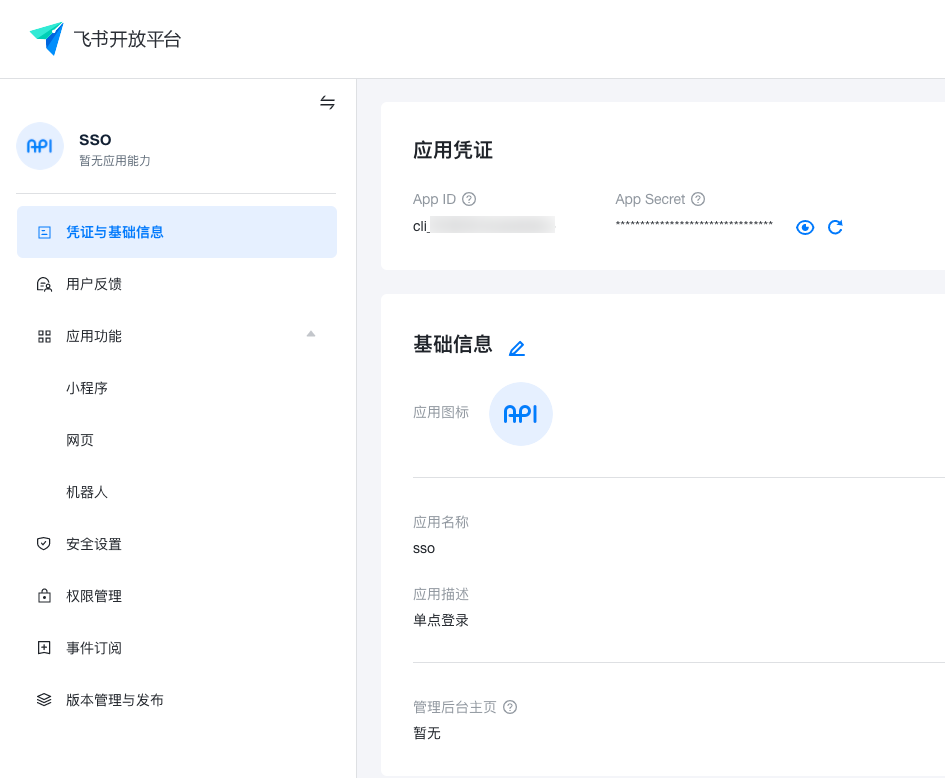
On the "Credentials and Basic Information" page of the newly created application, obtain application credentials.
-
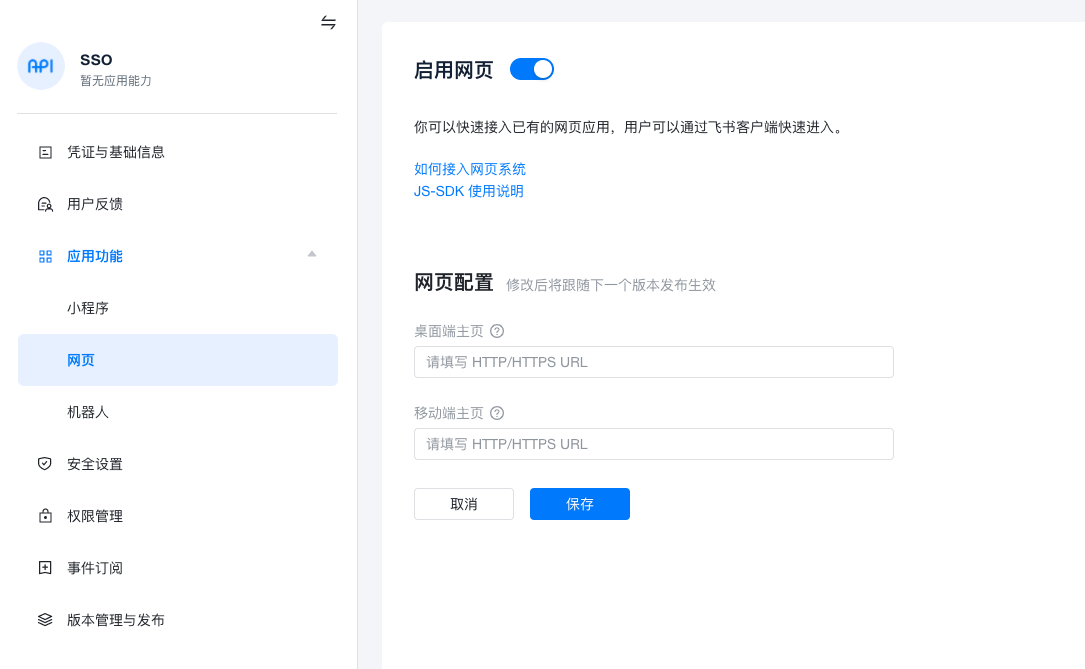
In Application Features - Web, enable web, and add the platform's access address in the desktop homepage in web configuration.
-
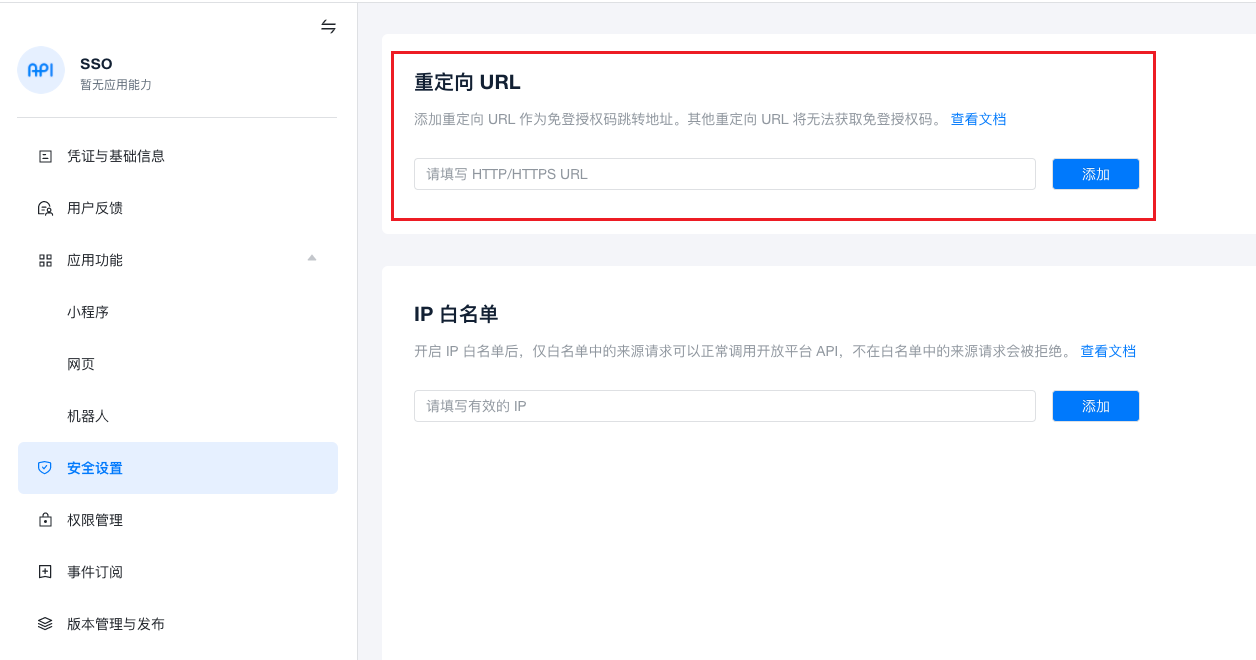
In Security Settings - Redirect URL, configure the callback address or domain "https://<domain>/api/v1/auth/ssologin".
- Set the platform to domain access, and set the access domain in Global Settings - Console Address.
- You can view the platform's callback address on the platform authentication source page.
-
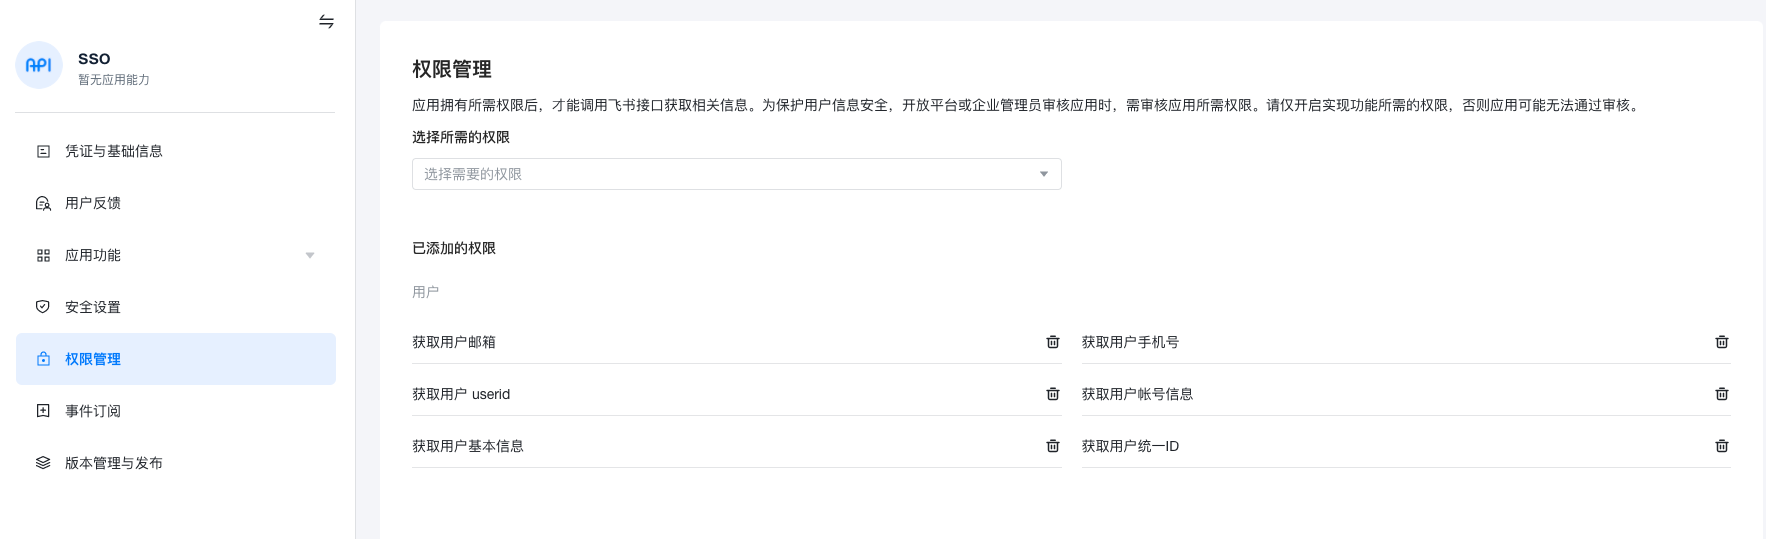
In Permission Management, add permissions to the application as needed. At minimum, add "Get User Email", "Get User Mobile Number", "Get User UserID", "Get User Basic Information", "Get User Unified ID".
-
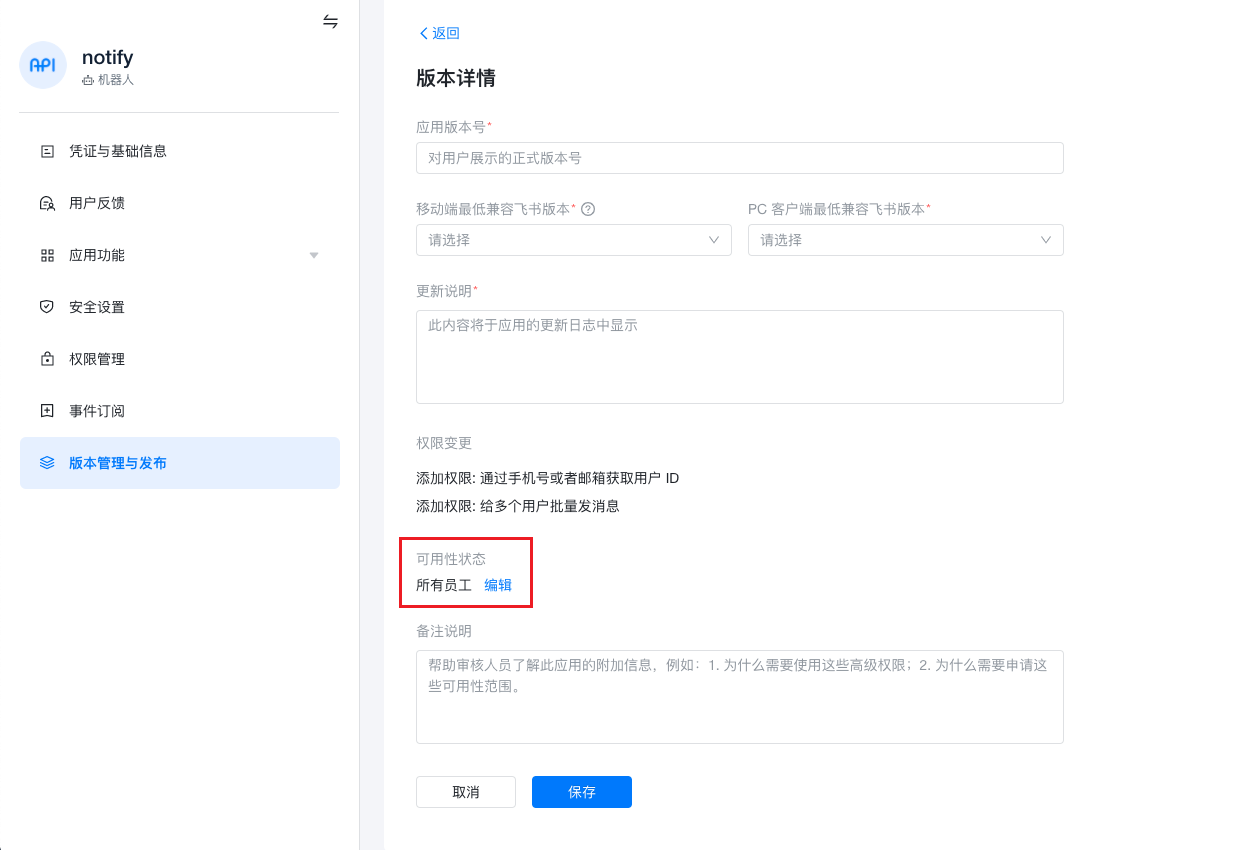
On the Version Management and Release page, create a version, configure related information. Note to set the availability status to "All Employees" or the organization applicable to the application, click the "Save" button, and wait for administrator review to publish the application.
DingTalk Parameter Acquisition Methods
For more content, please refer to DingTalk Official Documentation
-
Log in to the DingTalk Open Platform as an administrator.
-
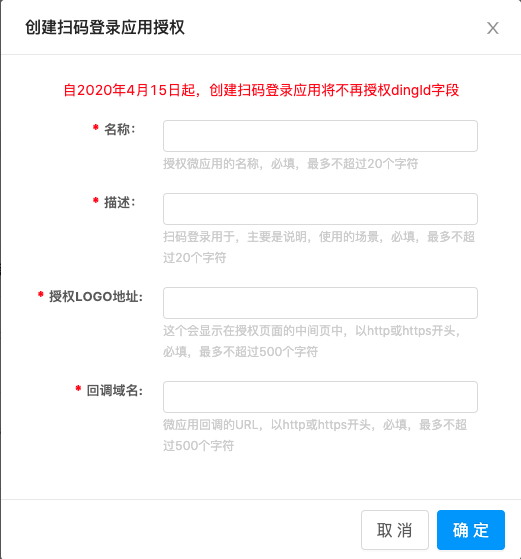
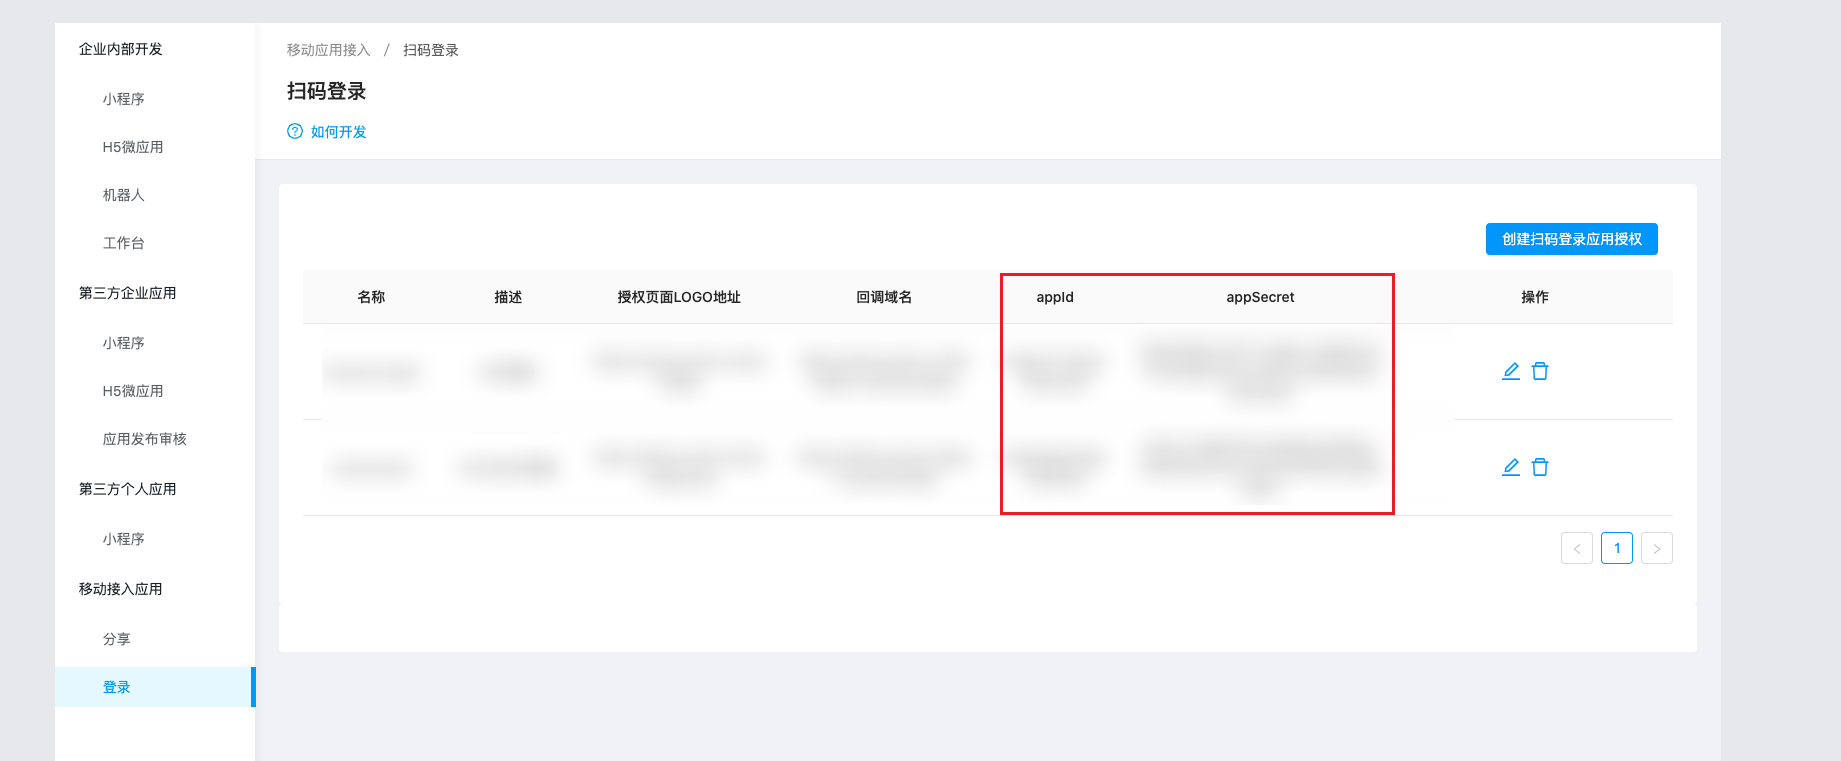
In the "Application Development" page - Mobile Access Application - Login page, create a QR code login application authorization.
-
Configure the callback domain as "https://<domain>/api/v1/auth/ssologin".
- Set the platform to domain access, and set the access domain in Global Settings - Console Address.
- You can view the platform's callback address on the platform authentication source page.
-
After creation is complete, you can obtain the corresponding AppId and AppSecret.
WeChat Work Parameter Acquisition Methods
-
Log in to the WeChat Work Management Backend as an administrator user
-
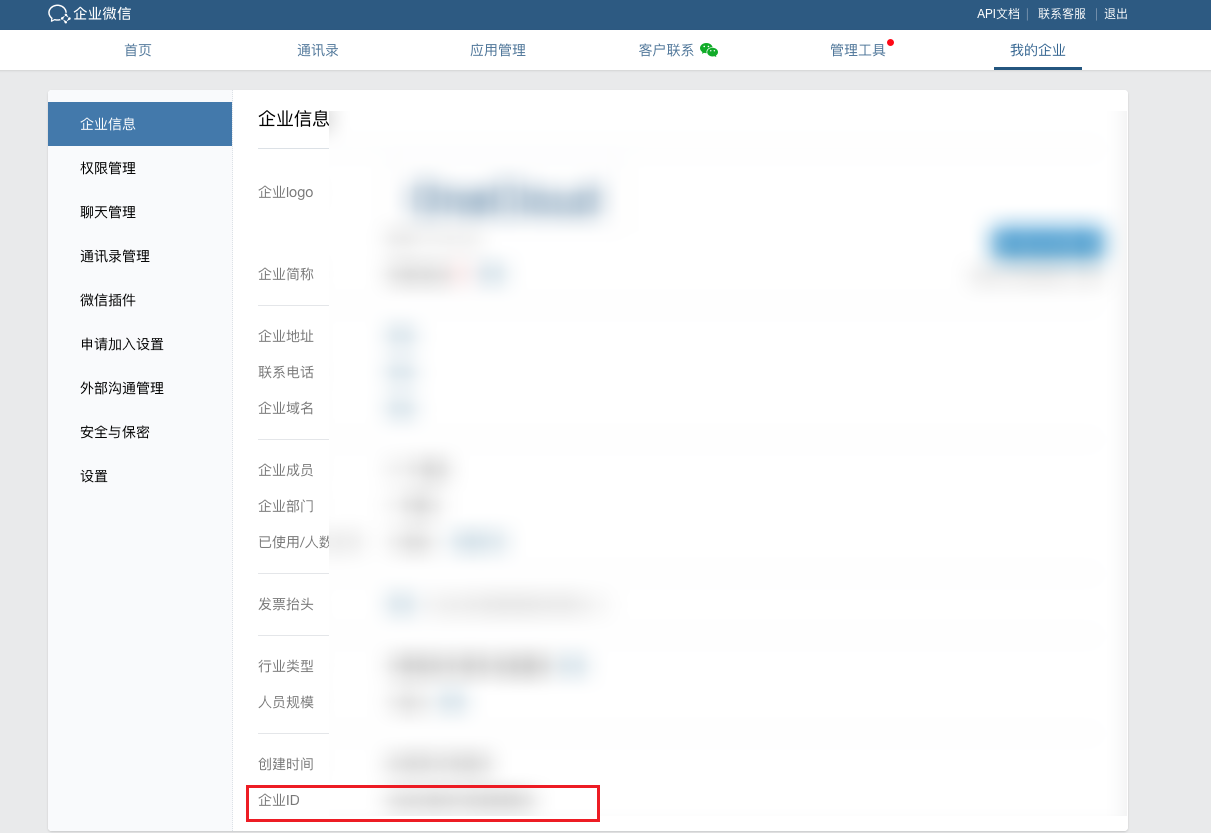
On the top - My Enterprise page, obtain the Enterprise ID.
-
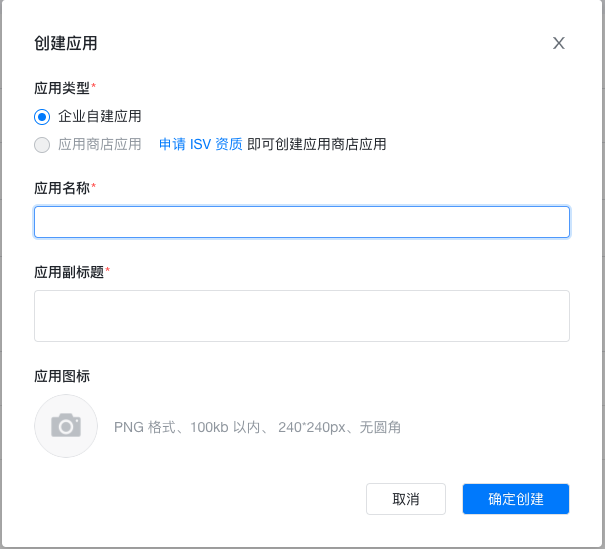
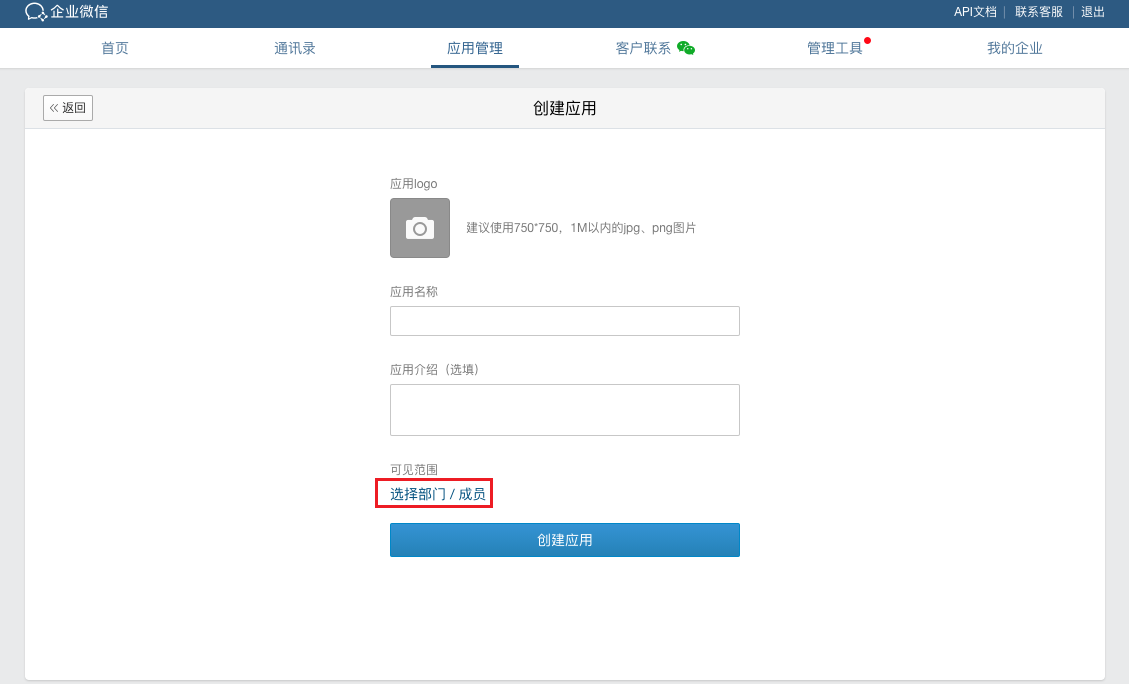
Under the top - Application Management tab, select Application - Create Self-built Application, and configure the application's logo, name, application introduction, and visibility scope. It is recommended to set the visibility scope to "All Employees" or the organization applicable to the application.
-
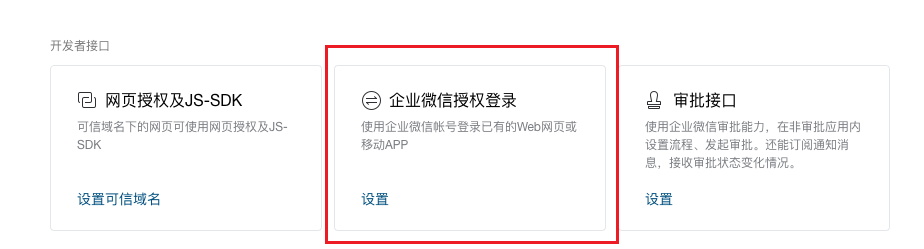
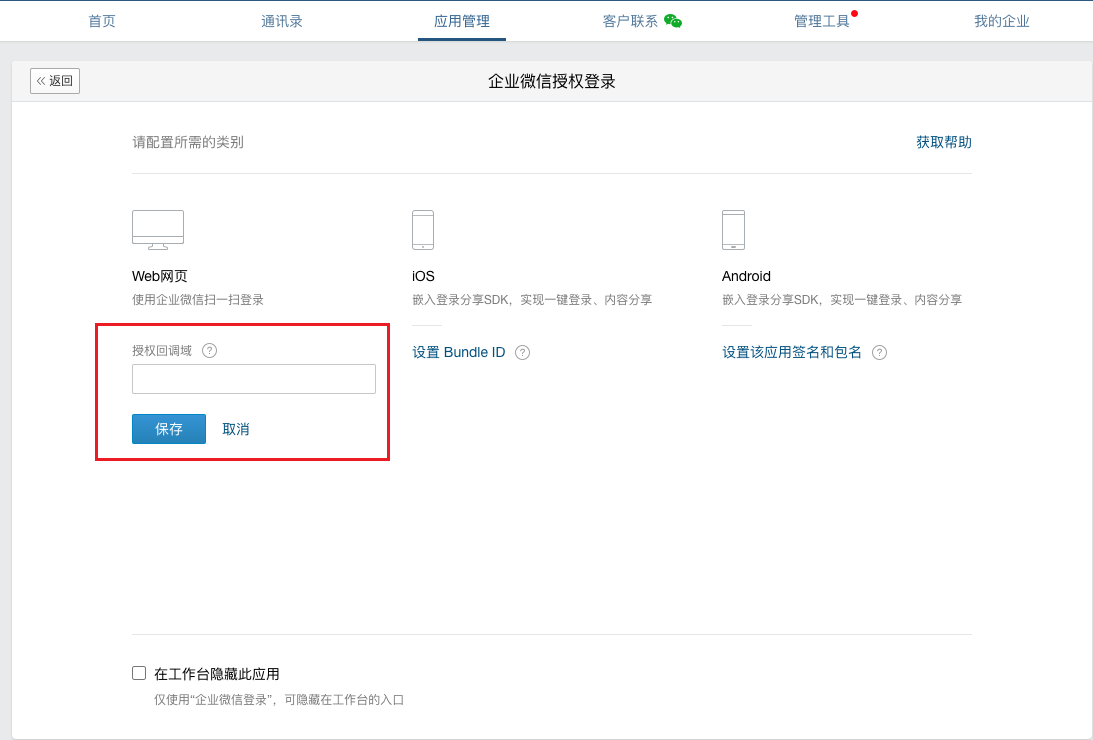
In Developer Interface - WeChat Work Authorization Login, set the authorization callback domain for Web pages to the domain address.
- Set the platform to domain access, and set the access domain in Global Settings - Console Address to https://<domain>.
- You can view the platform's callback address on the platform authentication source page. In WeChat Work, you only need to fill in the domain name.
-
In application details, obtain AgentId and Secret information.

Modify Configuration
This function is used to modify authentication source configuration information. Only authentication sources in disabled state support modifying configuration. For configuration parameters of authentication sources of different authentication types, please refer to the corresponding create authentication source section.
- Authentication sources with SQL authentication protocol do not support modifying configuration.
- On the authentication source page, click the "Modify Configuration" button in the operation column on the right side of the authentication source in "disabled" state to enter the modify configuration page.
- Modify parameters of authentication sources of different authentication types. After modification is complete, click the "OK" button.
Enable Authentication Source
This function is used to enable authentication sources in "disabled" state.
- Authentication sources with SQL authentication protocol do not support enabling.
Single Enable
- On the authentication source page, click the "More" button in the operation column on the right side of the authentication source in "disabled" state, select the "Enable" menu item from the dropdown menu, and a confirmation dialog will pop up.
- Click the "OK" button to enable the authentication source.
Batch Enable
- Check one or more authentication sources in the authentication source list, click the "Batch Operations" button above the list, select the "Enable" menu item from the dropdown menu, and a confirmation dialog will pop up.
- Click the "OK" button to enable the authentication sources.
Disable Authentication Source
This function is used to disable authentication sources in "enabled" state.
- Authentication sources with SQL authentication protocol do not support disabling.
- After an authentication source is disabled, users under that authentication source cannot log in to the system.
- On the authentication source page, click the "More" button in the operation column on the right side of the authentication source in "enabled" state, select the "Disable" menu item from the dropdown menu, and a confirmation dialog will pop up.
- Click the "OK" button to disable the authentication source.
Batch Disable
- Check one or more authentication sources in the authentication source list, click the "Batch Operations" button above the list, select the "Disable" menu item from the dropdown menu, and a confirmation dialog will pop up.
- Click the "OK" button to disable the authentication sources.
Synchronize Authentication Source
This function is used to immediately synchronize domain, group, and user information on the authentication source. It synchronizes every 15 minutes by default.
- Authentication sources with SQL authentication protocol do not support synchronization.
- On the authentication source page, click the "More" button in the operation column on the right side of the specified authentication source, select the "Synchronize" menu item from the dropdown menu to synchronize information on the authentication source.
Delete Authentication Source
This function is used to delete authentication sources.
- Authentication sources with SQL authentication protocol do not support deletion.
- When an authentication source does not support auto-creating users and is used as an auxiliary authentication source, the authentication source can be deleted as long as it is disabled.
- When an authentication source supports auto-creating users, there are two situations:
- When the user's domain is an existing domain in the system, the authentication source and users and groups under the authentication source can be deleted as long as the authentication source is disabled.
- When the user's domain is empty, i.e., automatically creating a domain, the authentication source and the domain, users, and groups automatically created by the authentication source can only be deleted when there are no projects under the domain automatically created by the authentication source and the authentication source is disabled.
Single Delete
- On the authentication source page, click the "Delete" button in the operation column on the right side of the authentication source in "disabled" state, and a confirmation dialog will pop up.
- Click the "OK" button to complete the operation.
Batch Delete
- Check one or more authentication sources in the authentication source list, click the "Batch Operations" button above the list, select the "Delete" menu item from the dropdown menu, and a confirmation dialog will pop up.
- Click the "OK" button to complete the operation.
View Authentication Source Details
This function is used to view detailed information about authentication sources.
- On the authentication source page, click the authentication source name item to enter the authentication source details page.
- The top menu items on the details page support management operations on the authentication source.
- View the following information.
- Basic Information: Including cloud ID, ID, name, status, project, authentication source ownership, enabled status, synchronization status, auto-create users, user domain, authentication protocol, authentication type, synchronization time, creation time, update time, remarks.
- Configuration Information: Different authentication types display different configuration information.
- IDP Source Data: Only generic SAML supports this. Supports downloading IDP source data.
- Resource Statistics: Including the number of groups, users, projects, roles, and permissions under the authentication source.
View Operation Logs
This function is used to view log information related to authentication source operations.
- On the authentication source page, click the authentication source name item to enter the authentication source details page.
- Click the "Operation Logs" tab to enter the operation logs page.
- Load More Logs: The list displays 20 operation log entries by default. If you need to view more operation logs, click the "Load More" button to get more log information.
- View Log Details: Click the "View" button in the operation column on the right side of the operation log to view detailed information about the log. Supports copying detail content.
- View Logs for Specified Time Period: If you need to view operation logs for a certain time period, set specific dates in the start date and end date in the upper right corner of the list to query log information for the specified time period.
- Export Logs: Currently only supports exporting logs displayed on this page. Click the download icon in the upper right corner, set the export data columns in the pop-up export data dialog, click the "OK" button to export logs.