Quick Installation via Ocboot
Use the ocboot deployment tool to quickly deploy Hybrid Cloud in an All in One manner.
The content in this chapter is used to quickly set up Cloudpods with the deployment tool. If you want to deploy a high availability cluster in a production environment, please refer to: [High Availability Installation] (./ha-ce).
Environment Preparation
Machine Configuration Requirements
- Operating System: Supported distributions vary depending on CPU architecture. The current situation of supported distributions is as follows:
- CentOS 7.6~7.9 Minimal: Supports x86_64 and arm64
- Debian 10/11: Supports x86_64 and arm64
- Ubuntu 22.04: Supports only x86_64
- Kylin V10 SP2: Supports x86_64 and arm64
- Deepin UOS kongzi: Supports x86_64 and arm64
- The operating system needs to be a clean version, as the deployment tool will build the specified version of Kubernetes cluster from scratch. Ensure that the system does not have container management tools such as Kubernetes and Docker installed, otherwise conflicts may occur and cause installation abnormalities.
- Minimum system requirements: CPU 4 cores, 8GiB memory, 100GiB storage.
- The storage paths used by virtual machines and services are both under /opt directory. Thus, it is recommended to set up a separate mount point for the /opt directory in an ideal environment.
- For example, create a separate partition for /dev/sdb1 and format it as ext4, then mount it to the /opt directory through /etc/fstab.
Install Ansible and Git
First, you need to install ansible and git. The minimum required version of Ansible is 2.11.12.
- CentOS 7
- Debian 10/11
- Kylin V10
- Other Operating Systems
# Install ansible and git locally
$ yum install -y epel-release git python3-pip
$ python3 -m pip install --upgrade pip setuptools wheel
$ python3 -m pip install 'ansible<=9.0.0'
If you receive an error related to locale, please execute:
if ! grep -q '^en_US.UTF-8' /etc/locale.gen; then
    echo 'en_US.UTF-8 UTF-8' >> /etc/locale.gen
    locale-gen
    echo 'LANG="en_US.UTF-8"' >> /etc/default/locale
    source /etc/default/locale
fi
# Install ansible and git locally
$ apt install -y git python3-pip
$ python3 -m pip install --upgrade pip setuptools wheel
$ python3 -m pip install 'ansible<=9.0.0'
Note: In the Debian 11 environment, if systemd.unified_cgroup_hierarchy=0 is not found in /proc/cmdline, ocboot will automatically configure the relevant GRUB options, rebuild the startup parameters, and restart the operating system so that k8s can be launched normally.
# Install ansible and git locally
$ yum install -y git python3-pip
$ python3 -m pip install --upgrade pip setuptools wheel
$ python3 -m pip install 'ansible<=9.0.0'
# Install ansible locally
$ python3 -m pip install --upgrade pip setuptools wheel
$ python3 -m pip install 'ansible<=9.0.0'
Install Cloudpods
The deployment tool is available at https://github.com/yunionio/ocboot. You need to clone the tool using git clone and then run the run.py script to deploy the service. The following is the operation steps:
# Use git clone the ocboot deployment tool locally
$ git clone -b release/3.11 https://github.com/yunionio/ocboot && cd ./ocboot
Next, execute the run.py script to deploy the service. The host_ip parameter is the IP address of the deployment node, which is optional. If not specified, the service will be deployed using the default route. If your node has multiple network cards, you can specify host_ip to select the corresponding network card to listen to the service.
- Mainland China
- Other Regions
# Directly deploy and pull the container image from registry.cn-beijing.aliyuncs.com
$ ./run.py full <host_ip>

# If there is a problem with slow pip installation package download,
# you can use the -m parameter to specify the pip source
# For example, use https://mirrors.aliyun.com/pypi/simple/ source below.
$ ./run.py -m https://mirrors.aliyun.com/pypi/simple/ full <host_ip>
For some network environments, if registry.cn-beijing.aliyuncs.com is slow or unreachable, you can specify the image source: docker.io/yunion to install, with the following command:
IMAGE_REPOSITORY=docker.io/yunion ./run.py full <host_ip>
The ./run.py script will call the ansible to deploy the service. If the deployment process encounters problems that cause the script to exit, you can repeat the script to retry.
If you are deploying based on the CentOS 7 distribution, there will be one restart caused by the kernel. The ./run.py script will be interrupted. Please wait for the operating system to restart, then execute the ./run.py script again to perform the subsequent steps.
Deployment Complete
....
# After completing the deployment, the following output will be displayed, indicating a successful run
# Open https://10.168.26.216 in the browser, where the ip is set to <host_ip>
# You can access the front-end interface by logging in with admin/admin@123
Initialized successfully!
Web page: https://10.168.26.216
User: admin
Password: admin@123
Then use a browser to access https://10.168.26.216. Enter admin for username and admin@123 for password to enter the Cloudpods interface.

Change the api_server access url
The api_server option is the address of the access point for the entire platform, which affects the front-end CloudShell, vnc or Web SSH connection. It is generally impossible to open CloudShell or login the virtual machine through the front-end SSH when the api_server configuration has not been set correctly.
You need to modify it manually according to your environment, refer to the document: Change service api_server configuration.
Getting Started with Cloudpods
Create the First Private Cloud Virtual Machine
To create the first virtual machine, follow these three steps:
1. Import image
Go to CentOS 7 cloud host image and choose a GenericCloud image. Copy the image URL.
In the Host menu, select System image, and then select Upload. Enter the image name, select Input image URL, paste the CentOS 7 image URL, and click OK.
Visit https://docs.openstack.org/image-guide/obtain-images.html for more virtual machine images.
2. Create network (VPC and IP subnet)
[Create VPC] In the Network menu, select VPC submenu, and then select Create. Enter the name, such as vpc0, and select the target network segment, such as 192.168.0.0/16. Click Create.
[Create IP subnet] After VPC creation, select the IP subnet submenu, and then select Create. Enter the name, such as vnet0, select the VPC as the created VPC vpc0, select the availability zone, enter the subnet network segment, such as 192.168.100.0/24. Click Create.
Typical network configuration provides several common host network configurations for reference.
3. Create virtual machine
In the Host menu, select Virtual Machine, and then select Create. Enter the hostname, select the image and IP subnet, and create the virtual machine.
Import Public Cloud or Other Private Cloud Platform Resources
Cloudpods can unify and manage resources from other cloud platforms.
In the Multi-Cloud Management menu, select Cloud Accounts and create a new one. Fill in the authentication information for the corresponding cloud platform according to your needs. After configuring the cloud account, the Cloudpods service will synchronize the corresponding cloud platform resources. Once the synchronization is complete, you can view them in the front-end.

FAQ
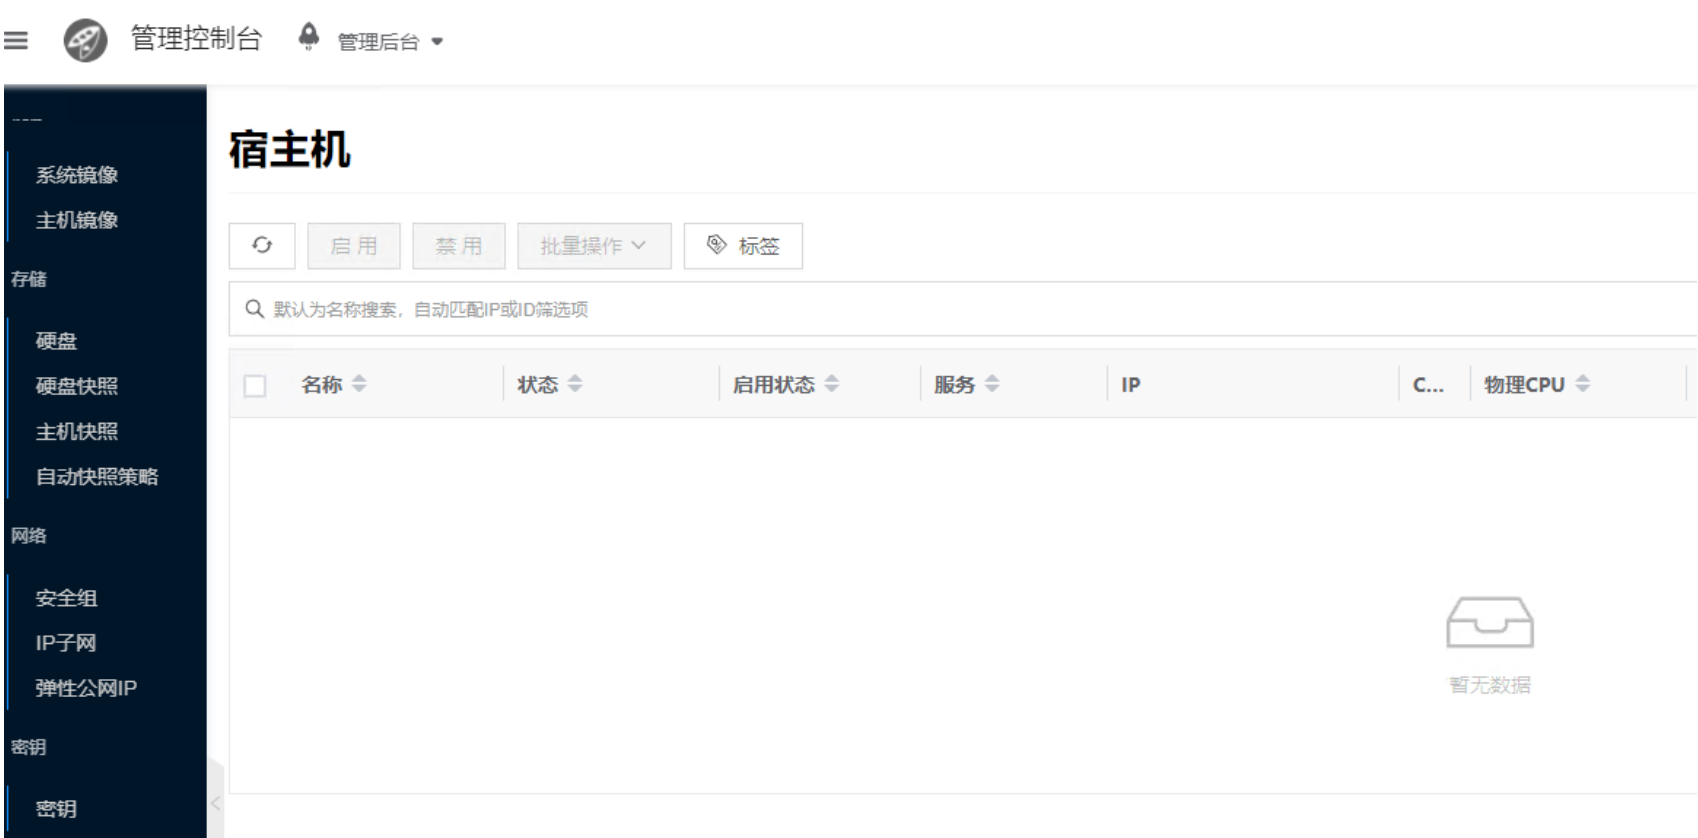
1. After the All in One deployment is complete, there is no host in the host list?
As shown in the figure below, if there is no host in the host list after the environment is deployed, you can troubleshoot as follows:
-
To troubleshoot host issues on the control node, please refer to: Troubleshooting Host Service Issues
- If the log error message contains "register failed: try create network: find_matched == false", it means that the IP subnet containing the host has not been successfully created, resulting in host registration failure. Please create an IP subnet containing the host network segment.
# Create an IP subnet containing the host network segment
$ climc network-create bcast0 adm0 <start_ip> <end_ip> mask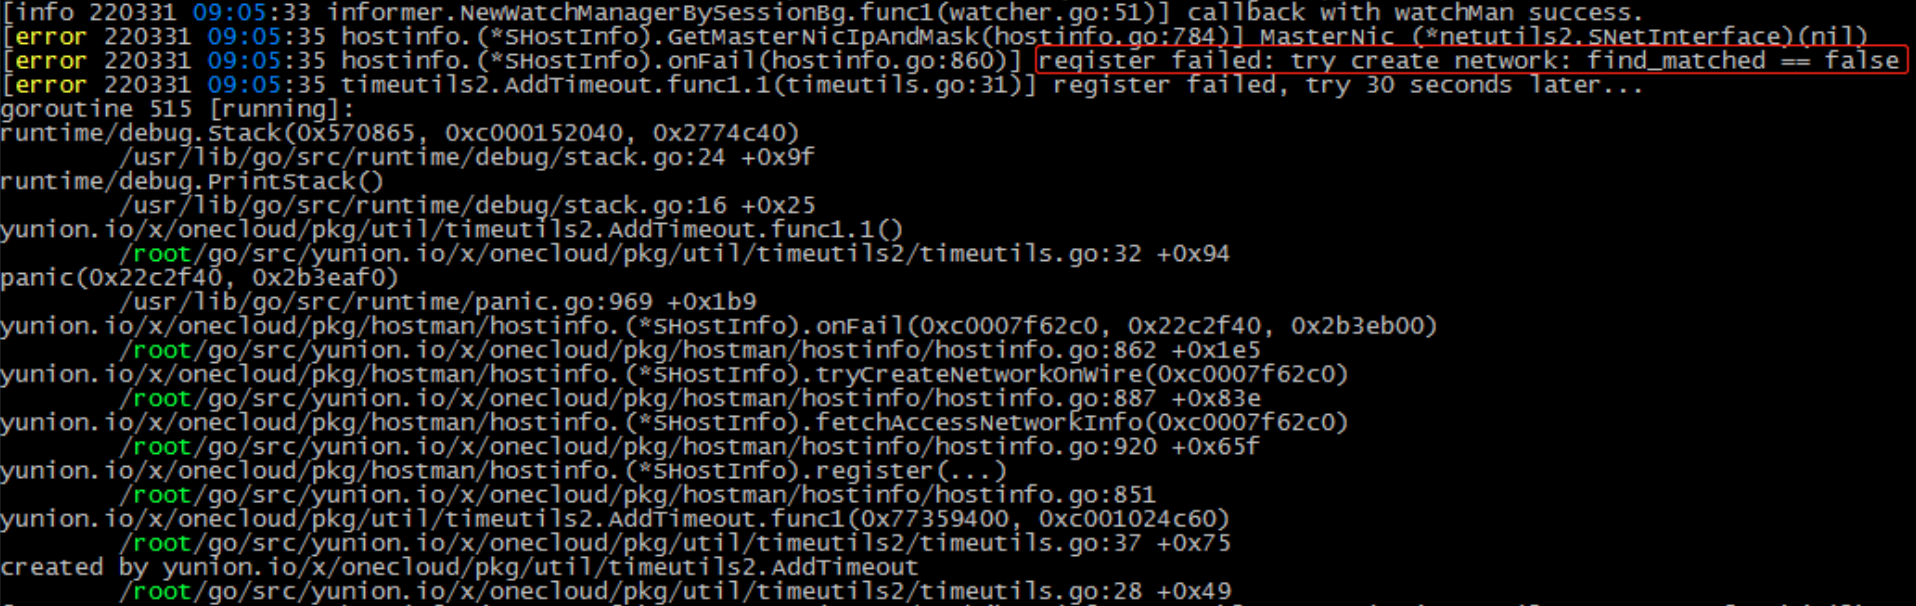
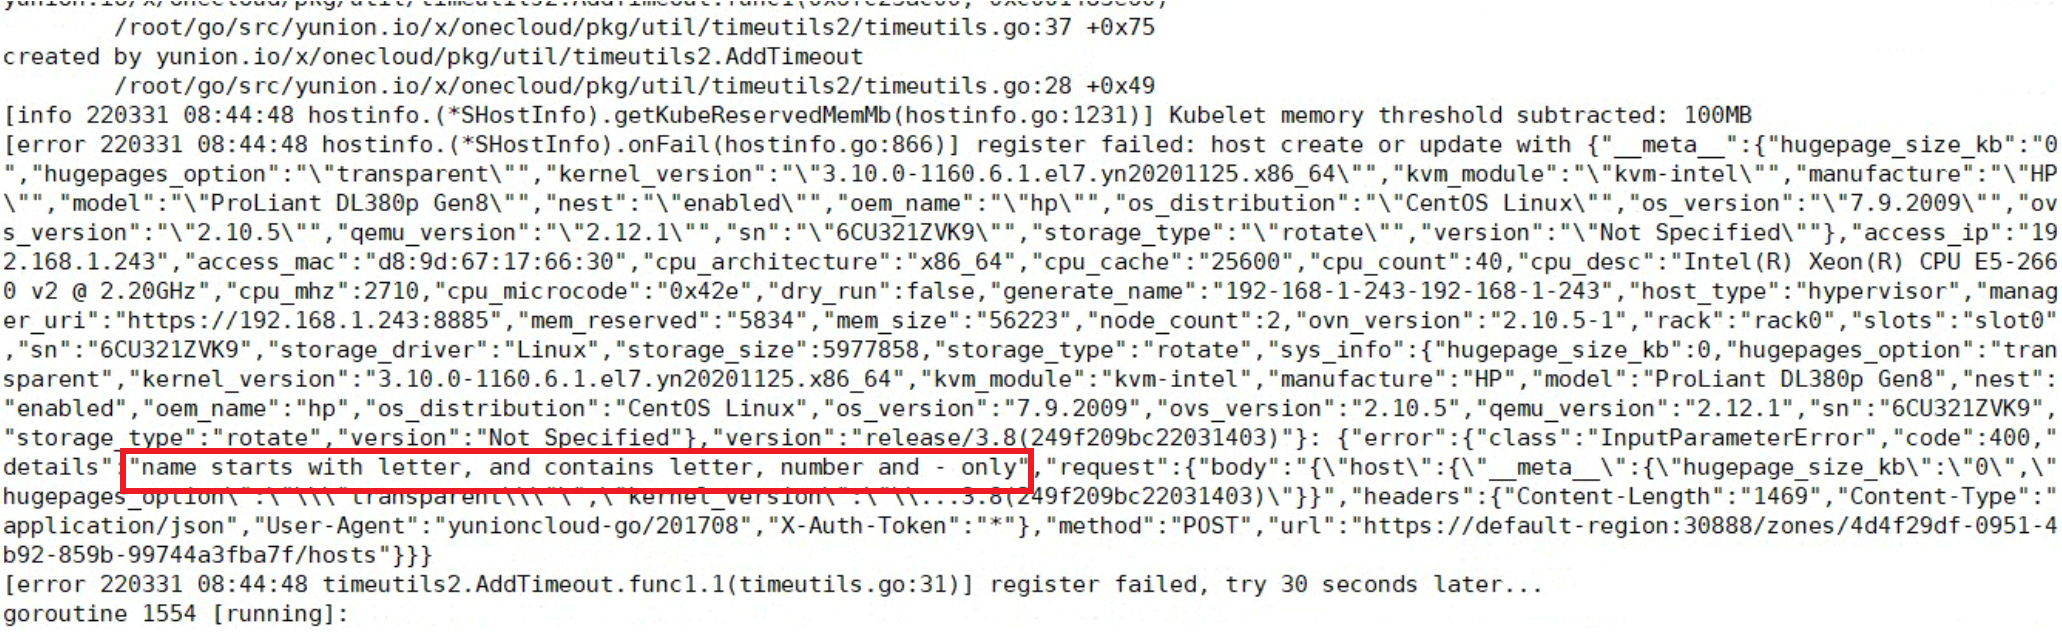
- If the log error message contains "name starts with letter, and contains letter, number and - only", it means that the hostname of the host is not compliant and should be changed to a hostname starting with a letter.
2. Cannot find the virtual machine interface?
The nodes deployed by All in One will deploy the Cloudpods host computing service as the host machine, which has the ability to create and manage private cloud virtual machines. If there is no virtual machine interface, it means that the host machine is not enabled in the Cloudpods environment.
Please go to the Management Console interface, click Host/Basic Resources/Host to view the host list, enable the corresponding host, and refresh the interface to display the virtual machine interface.
If you want to use Cloudpods private cloud virtual machines, and the host machine is a distribution of CentOS 7, the host machine needs to use the kernel compiled by Cloudpods. You can use the following command to check if the host machine is using the Cloudpods kernel (containing the keyword "yn").
# Check whether to use the yn kernel
uname -a | grep yn
Linux office-controller 3.10.0-1160.6.1.el7.yn20201125.x86_64

# If the kernel version does not contain the keyword "yn", it may be the first time the ocboot is installed, and you can enter the yn kernel by restarting.
reboot

3. Why does the service fail to start after changing the hostname of the node?
Cloudpods uses Kubernetes to manage nodes at the underlying layer, and the Kubernetes node name depends on the hostname. Changing the hostname will cause the node to fail to register with the Kubernetes cluster, so do not modify the hostname. If modified, change back to the original name and the service will automatically recover.
4. How to reinstall?
Follow the steps below to reinstall:
-
Execute
kubeadm reset -fto delete the Kubernetes cluster. -
Run the
run.pyscript of ocboot again.
5. Other issues?
Other issues can be submitted through the Cloudpods GitHub issues page: https://github.com/yunionio/cloudpods/issues, we will respond as soon as possible.