Create Image
Create Using Packer
If you need to customize distribution images for different business use, you need to create images yourself.
You can download the distribution operating system's ISO, then locally start a virtual machine, install the ISO to the virtual machine's disk, then save that disk. This disk can be uploaded to glance as an image. However, this method has too many manual steps and is error-prone.
It is recommended to use packer tool to automate image creation. For detailed operations, please refer to the corresponding documentation: https://www.packer.io/docs/index.html.
The https://github.com/yunionio/service-images repository contains some configurations we use packer to create images, which you can refer to.
Manual Creation Process
Import ISO
- Prepare standard ISO images in advance. Support users to import from Image Market-ISO interface or directly upload ISO images.
- Create a new virtual machine in the virtual machine list, select "Boot from ISO" and select the corresponding ISO image. After creation is successful, install the operating system through VNC terminal according to interface prompts.
- It is recommended to use CentOS Minimal operating system.
- For Ubuntu/Debian images, it is recommended to select "No automatic updates" during installation and install OpenSSH Server software.
- Perform different optimization configurations according to the image's operating system type.
- CentOS images: Please refer to CentOS Image Optimization section.
- Ubuntu/Debian images: Please refer to Ubuntu/Debian Image Optimization section.
- Windows images: Please refer to Windows Image Optimization section.
- (Optional) Multi-platform universal image configuration. If the created image needs to be used on public cloud platforms, in addition to the above optimization configurations, you also need to Install and Configure cloud-init for Linux Systems, Install and Configure Cloudbase-init for Windows Systems.
- After image optimization is complete, you need to shut down the virtual machine.
- Click the "More" button in the operation column on the right side of the powered-off virtual machine, select the dropdown menu "Save Image" menu item to save the virtual machine as a system image.
- After the image is saved, users can create a new virtual machine in the virtual machine list, select "Custom Image" and select the image saved in the previous step, use the created image to create a virtual machine, and verify whether the image creation is successful.
CentOS Image Optimization
Taking CentOS 7 minimal image as an example to introduce image optimization methods.
-
After CentOS 7 Minimal operating system installation is complete, the virtual machine cannot connect to the network by default. You need to modify the /etc/sysconfig/network-scripts/ifcfg-eth0 file, change "ONBOOT=no" to "ONBOOT=yes".
# Please modify the corresponding configuration file according to the actual network card name$ vi /etc/sysconfig/network-scripts/ifcfg-eth0 # Please modify the corresponding configuration file according to the actual network card name# Modify configuration file contentONBOOT=yes# CentOS 8 and CentOS 9 restart network card: systemctl restart NetworkManager.service -
Disable selinux, modify /etc/selinux/config file, change "SELINUX=enforcing" to "SELINUX=disabled". After modification is complete, restart the system to take effect.
$ vi /etc/selinux/config# Modify configuration file content, save after modification is complete.SELINUX=disabled# Restart to make configuration take effect$ reboot -
Add necessary kernel modules to boot initram.img. (CentOS 8 kernel already has virtio installed, so it needs to be removed from the list)
$ vi /etc/dracut.conf# Modify configuration file, remove # comment before add_drivers+, and add the following content in quotes, save after modification is complete.# The following are kernel drivers that need to be added for x86add_drivers+=" hpsa mptsas mpt2sas mpt3sas megaraid_sas mptspi virtio virtio_ring virtio_pci virtio_scsi virtio_blk vmw_pvscsi nvme "# The following are kernel drivers that need to be added for armadd_drivers+=" mptsas mpt2sas mpt3sas megaraid_sas mptspi virtio virtio_ring virtio_pci virtio_scsi virtio_blk nvme "# Make configuration take effect$ dracut -f -
Disable network card persistence function to ensure network card names in CentOS 7 are in "eth0, eth1" form. Modify /etc/default/grub file, add "net.ifnames=0 biosdevname=0" parameters to GRUB_CMDLINE_LINUX. (Skip for centos8, centos9)
$ vi /etc/default/grub# Modify configuration file, save after modification is complete.GRUB_CMDLINE_LINUX="crashkernel=auto rd.lvm.lv=centos/root rd.lvm.lv=centos/swap rhgb quiet net.ifnames=0 biosdevname=0"# Make configuration take effect$ grub2-mkconfig -o /boot/grub2/grub.cfg -
Install common software according to requirements.
# This is just an example, please install common software according to actual requirements.$ yum install net-tools git wget vim pcre-tools ntp epel-release -y -
Disable firewalld and NetworkManager services.
$ systemctl disable firewalld NetworkManager -
Enable time network synchronization, support using ntp or chrony to maintain time synchronization.
# Install ntp or chrony software$ yum install ntp/chrony -y# Enable ntp or chronyd service$ systemctl enable ntpd/chronyd -
Modify timezone to CST.
$ timedatectl set-timezone Asia/Shanghai# View current timezone$ timedatectl status -
SSH service optimization, modify /etc/ssh/sshd_config file, change PermitRootLogin attribute to yes, change UseDNS attribute to no.
$ vi /etc/ssh/sshd_config# Find PermitRootLogin attribute and UseDNS attribute respectivelyPermitRootLogin yesUseDNS nosystemctl restart sshd
Ubuntu/Debian Image Optimization
Taking ubuntu-16.04.6-server-amd64.iso as an example, introduce Ubuntu and Debian image optimization methods. After Ubuntu system installation is complete, it uses ordinary permission users by default.
-
SSH service optimization, modify /etc/ssh/sshd_config file, change PermitRootLogin attribute to yes, change UseDNS attribute to no. If the above attributes do not exist, please add attributes.
$ sudo vi /etc/ssh/sshd_config# Find PermitRootLogin attribute and UseDNS attribute respectivelyPermitRootLogin yesUseDNS no -
Create a startup script named ssh-initkey in /etc/init.d/ directory.
$ sudo touch /etc/init.d/ssh-initkey$ sudo vi /etc/init.d/ssh-initkey# Script content is as follows:#! /bin/sh### BEGIN INIT INFO# Provides: ssh-initkey# Required-Start:# Required-Stop:# X-Start-Before: ssh# Default-Start: 2 3 4 5# Default-Stop:# Short-Description: Init ssh host keys### END INIT INFOPATH=/sbin:/usr/sbin:/bin:/usr/bin. /lib/init/vars.sh. /lib/lsb/init-functionsdo_start() {ls /etc/ssh/ssh_host_* > /dev/null 2>&1if [ $? -ne 0 ]; thendpkg-reconfigure openssh-serverfi}case "$1" instart)do_start;;restart|reload|force-reload)echo "Error: argument '$1' not supported" >&2exit 3;;stop);;*)echo "Usage: $0 start|stop" >&2exit 3;;esac -
After ssh-initkey script configuration is complete, you also need to add executable permissions and add the script to the system startup script directory.
$ sudo chmod +x /etc/init.d/ssh-initkeyFor Ubuntu versions before 20.04, please execute the following script to enable the script:
$ sudo /usr/sbin/update-rc.d ssh-initkey defaults$ sudo /usr/sbin/update-rc.d ssh-initkey enableFor Ubuntu 20.04 and later versions, please execute the following script to enable the script:
$ sudo /lib/systemd/systemd-sysv-install enable ssh-initkey -
(Settings for Ubuntu 16.04 and above) Disable network card persistence function to ensure network card names are in "eth0, eth1" form. Modify /etc/default/grub file, add "net.ifnames=0 biosdevname=0" parameters to GRUB_CMDLINE_LINUX.
$ sudo vi /etc/default/grub# Configure GRUB_CMDLINE_LINUX parametersGRUB_CMDLINE_LINUX="net.ifnames=0 biosdevname=0"# Make configuration take effect$ sudo /usr/sbin/update-grub -
(If Ubuntu has not disabled automatic updates) Disable automatic updates, need to modify /etc/apt/apt.conf.d/10periodic file, set "Update-Package-Lists" parameter in the file to 0.
$ sudo vi /etc/apt/apt.conf.d/10periodic# Configuration modificationAPT::Periodic::Update-Package-Lists "0"; -
At this point, virtual machine optimization is complete.
Windows Image Optimization
Install Virtio Driver
| Operating System Version | Corresponding Name in Virtio Driver |
|---|---|
| Windows XP | xp |
| Windows 7 | w7 |
| Windows 8 | w8 |
| Windows 8.1 | w8.1 |
| Windows 10 | w10 |
| Windows Server 2003 | 2k3 |
| Windows Server 2008 | 2K8 |
| Windows Server 2008 R2 | 2k8R2 |
| Windows Server 2012 | 2k12 |
| Windows Server 2012 R2 | 2k12R2 |
| Windows Server 2016 | 2k16 |
-
Upload Virtio driver ISO and mount it to the virtual machine. Virtio driver can be downloaded from the following URL:
https://github.com/virtio-win/virtio-win-pkg-scripts/blob/master/README.md
If using the enterprise edition, you can directly import the Virtio driver from the Image Market ISO page.
Note that if it is Windows Server 2008 and earlier versions of Windows, it is recommended to use version 0.1.135 of virtio driver.
-
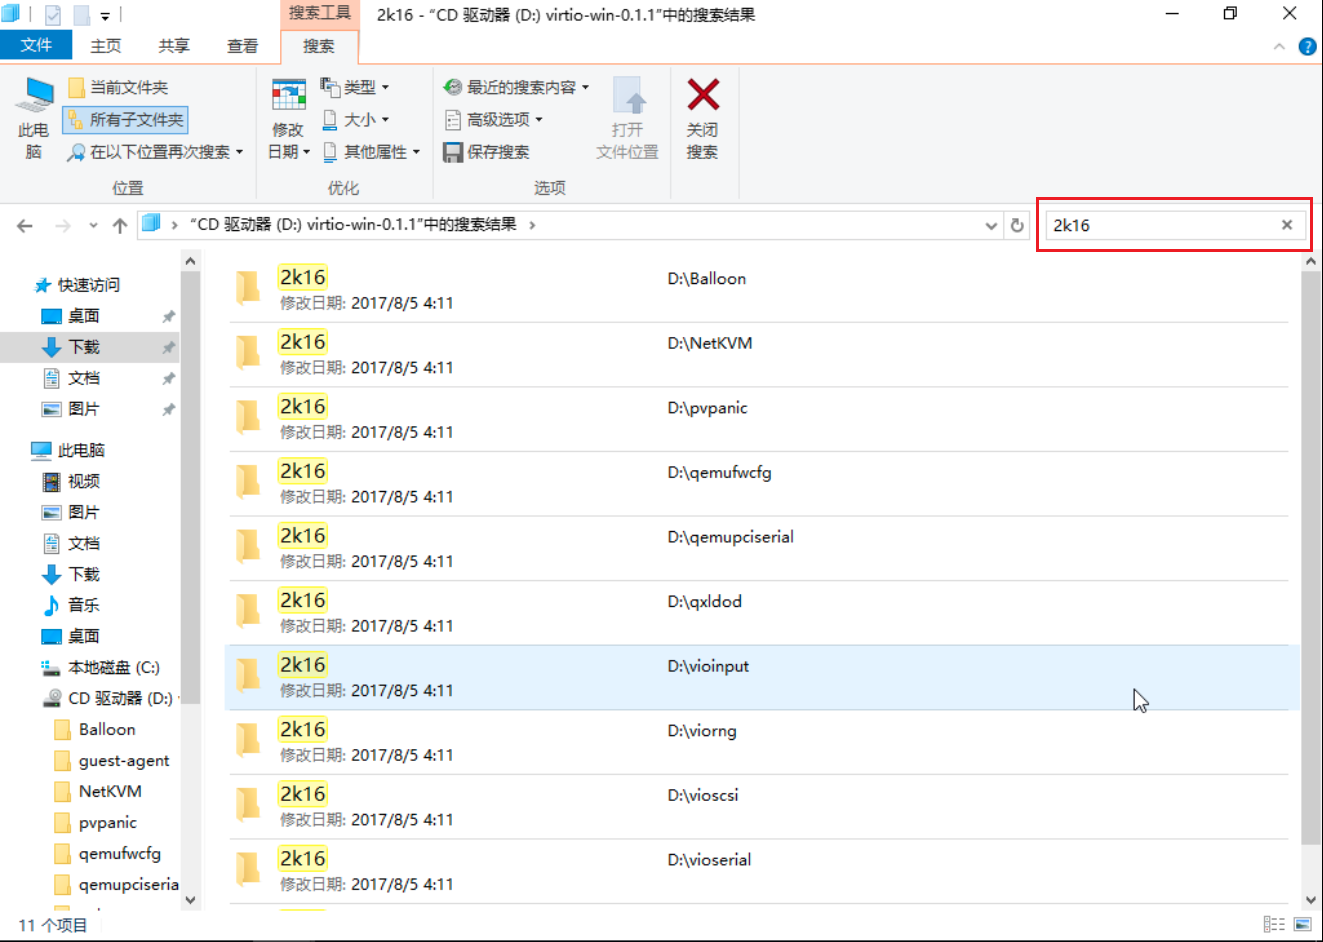
Open the mounted driver folder in the virtual machine. According to the virtual machine's operating system version (such as Windows server 2016 in this example), search for "2k16" in the driver folder page's search box, and copy all folders containing 2k16 to other folders in the virtual machine (such as the Documents folder).
-
Open the "2k16>amd64" folder in the Documents folder. This folder contains all driver files in Windows Server 2016. Enter cmd in the address display box of this folder or press "shift" key and right-click the mouse at the same time, open a command window here, open the command prompt dialog.
-
Use the following command to install all drivers.
pnputil -i -a *.inf
Set System Time
Windows treats system hardware time (CMOS time) as local time, that is, the time displayed in the operating system is the same as the time displayed in CMOS. Linux/Unix/Mac treats CMOS time as UTC time. The time displayed in the operating system is calculated from CMOS time. Intuitively, Windows virtual machines on Linux hosts will display time exactly 8 hours different from Beijing time. Therefore, you need to configure the system to display Beijing time.
Modification method: Run regedit, open the registry, under
HKEY_LOCAL_MACHINE\SYSTEM\CurrentControlSet\Control\TimeZoneInformation
Right-click New > DWORD (32-bit) Value, name it RealTimeIsUniversal, value is 1.
Note: If it is a Windows virtual machine created through system images, the platform will automatically inject this configuration into the registry.
Disable Fast Startup
If it is a Windows 10 operating system virtual machine, you need to disable fast startup. Please refer to Disable Method.
System Activation
Please activate Windows system through official channels.
sysprep Packaging
Run sysprep to eliminate personalization information.
- Open %WINDIR%/system32/sysprep directory, and create unattend.xml file in the directory with the following content:
<?xml version="1.0" encoding="utf-8"?>
<unattend xmlns="urn:schemas-microsoft-com:unattend">
    <settings pass="generalize">
        <component name="Microsoft-Windows-Security-SPP" processorArchitecture="amd64" publicKeyToken="31bf3856ad364e35" language="neutral" versionScope="nonSxS" xmlns:wcm="http://schemas.microsoft.com/WMIConfig/2002/State" xmlns:xsi="http://www.w3.org/2001/XMLSchema-instance">
            <SkipRearm>0</SkipRearm>
        </component>
        <component name="Microsoft-Windows-PnpSysprep" processorArchitecture="amd64" publicKeyToken="31bf3856ad364e35" language="neutral" versionScope="nonSxS" xmlns:wcm="http://schemas.microsoft.com/WMIConfig/2002/State" xmlns:xsi="http://www.w3.org/2001/XMLSchema-instance">
            <PersistAllDeviceInstalls>true</PersistAllDeviceInstalls>
            <DoNotCleanUpNonPresentDevices>true</DoNotCleanUpNonPresentDevices>
        </component>
    </settings>
    <settings pass="oobeSystem">
        <component name="Microsoft-Windows-Shell-Setup" processorArchitecture="amd64" publicKeyToken="31bf3856ad364e35" language="neutral" versionScope="nonSxS" xmlns:wcm="http://schemas.microsoft.com/WMIConfig/2002/State">
            <AutoLogon>
                <Password>
                    <Value>123@yunion</Value>
                    <PlainText>true</PlainText>
                </Password>
                <Username>Administrator</Username>
                <Enabled>true</Enabled>
                <LogonCount>5</LogonCount>
            </AutoLogon>
            <UserAccounts>
                <AdministratorPassword>
                    <Value>123@yunion</Value>
                    <PlainText>true</PlainText>
                </AdministratorPassword>
            </UserAccounts>
            <Display>
                <ColorDepth>32</ColorDepth>
                <HorizontalResolution>1024</HorizontalResolution>
                <RefreshRate>60</RefreshRate>
                <VerticalResolution>768</VerticalResolution>
            </Display>
            <OOBE>
                <HideEULAPage>true</HideEULAPage>
                 <NetworkLocation>Work</NetworkLocation>
                <ProtectYourPC>1</ProtectYourPC>
                <SkipMachineOOBE>true</SkipMachineOOBE>
                <SkipUserOOBE>true</SkipUserOOBE>
            </OOBE>
        </component>
    </settings>
</unattend>
Since Windows system only supports VNC connection, content cannot be directly copied to the virtual machine. You can use the send text function, when the virtual machine input method is in English mode, send the above content.
- Enter cmd in the address display box of this directory or press "shift" key and right-click the mouse at the same time, open a command window here, open the command prompt dialog. Enter the following command to execute sysprep packaging and shut down the virtual machine.
$ sysprep /generalize /oobe /shutdown /unattend:unattend.xml
Note: After Windows 10 version 1803, there are cases where sysprep fails. Generally, the failure reason is mainly that if the system has installed software from Windows store, sysprep reports an error when uninstalling software from Windows store. You need to manually uninstall the software packages that cause errors one by one. The method to uninstall each software package is:
- After each sysprep error, you can check the error log: C:\Windows\System32\Sysprep\Panther\setupact.log . The log has error information similar to the following:
2018-06-21 13:35:59, Error SYSPRP Package Microsoft.LanguageExperiencePackhu-hu_17134.2.4.0_neutral__8wekyb3d8bbwe was installed for a user, but not provisioned for all users. This package will not function properly in the sysprep image.
Among them, after Package is the package name that failed to uninstall. Use the following command to manually uninstall this package:
- Manually uninstall the specified package, where <packagefullname> is replaced with the package name found in step 1.
remove-appxpackage -allusers -package '<packagefullname>'
Repeat trying to execute sysprep. If it fails, execute the above steps 1) and 2) to delete packages, until sysprep executes successfully.
If sysprep still cannot be executed after uninstalling software, please try modifying unattend.xml, change "PersistAllDeviceInstalls" to "false".
- At this point, virtual machine optimization is complete.
Linux System Install and Configure Cloud-init (Optional)
Cloud-init is used to do system initialization configuration for Linux operating system virtual machines. For detailed introduction, please refer to cloud-init official website.
Install cloud-init
Use the cloud-init package on the software source to install cloud-init in Linux operating system. The command is as follows:
# CentOS and other distributions
$ yum install cloud-init

# Ubuntu/Debian and other distributions
$ apt install cloud-init
For more information on installing Cloud-init in Linux operating systems, please refer to Tencent Cloud Documentation Center-Linux System Install cloud-init or Alibaba Cloud Documentation Center-Install cloud-init, etc.
Configure cloud-init
Modify /etc/cloud/cloud.cfg file, set disabled_root to 0, ssh_pwauth to 1.
$ vi /etc/cloud/cloud.cfg
# Modify configuration file, save after modification is complete.
disable_root: 0
ssh_pwauth:   1
Windows System Install and Configure Cloudbase-init (Optional)
Please refer to Tencent Cloud Documentation Center-Windows Operating System Install Cloudbase-Init.
ESXi Image Optimization
The platform supports installing ESXi from ISO and saving it as an image. Before saving the image, it is recommended to do the following configuration:
Enter ESXi shell, execute the following command (Reference: https://kb.vmware.com/s/article/1031111)
esxcfg-advcfg -s 1 /Net/FollowHardwareMac