Contributing Code
Introduction to the process of creating pull requests and submitting code from GitHub.
Fork Repository
Visit https://github.com/yunionio/cloudpods and fork the repository to your own GitHub account.
Clone Source Code
Clone your forked repository and set upstream to the source repository.
$ git clone https://github.com/<your_name>/cloudpods
$ cd cloudpods
$ git remote add upstream https://github.com/yunionio/cloudpods
Code Submission Process
1. Checkout feature or bugfix branch from master
# Checkout new branch
$ git fetch upstream --tags

# Assume the new branch name is 'feature/implement-x'
# Branch names should be semantic, describing what this development will implement or fix
$ git checkout -b feature/implement-x upstream/master
2. Develop on the new branch
All code modifications are done on the new branch.
If you are not familiar with git operations, you can refer to this document to learn basic git operations: Git-Tutorials.
3. Prepare for PR submission after development is complete
# Sync remote upstream master code
$ git fetch upstream

# Resolve conflicts if any
$ git rebase upstream/master

# Push branch to your own repo
$ git push origin feature/implement-x
4. Complete PR submission process on GitHub Web interface
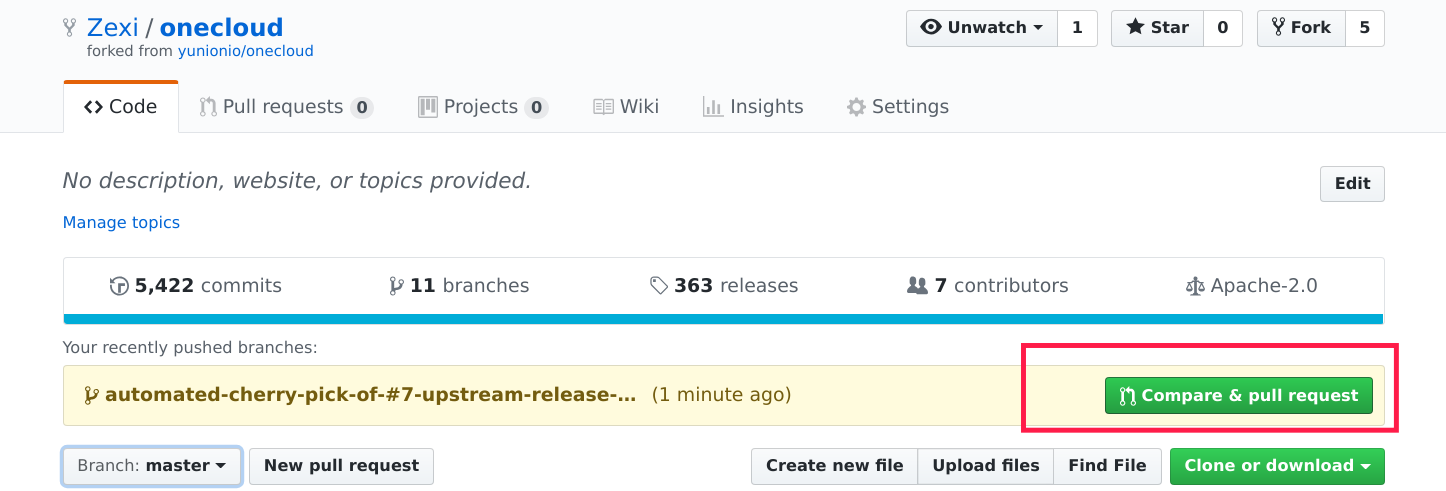
- After submitting the PR, request relevant developers to review and set Labels to indicate which module or modules the submitted code belongs to.
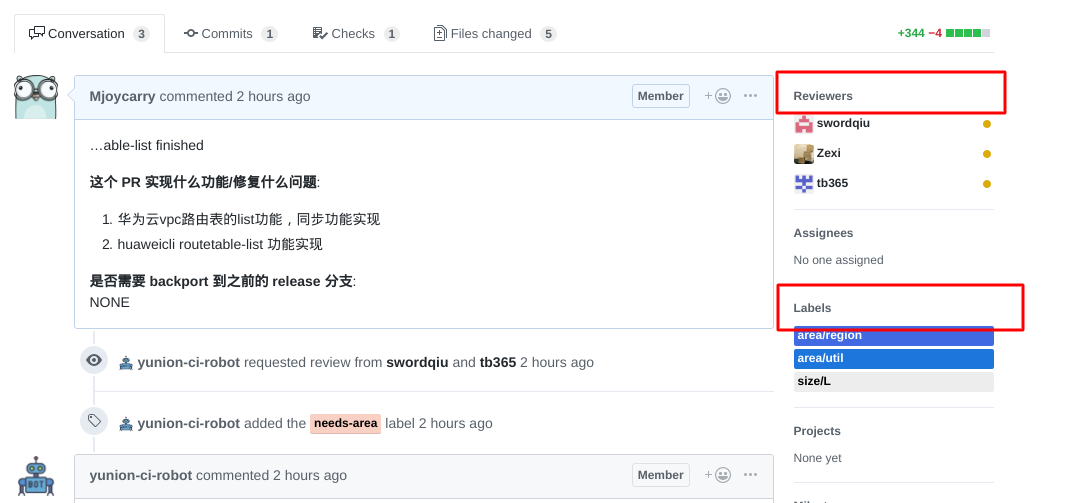
- Or complete the previous step by adding comments; comment "/cc" and @ relevant personnel to set reviewer, comment /area module name to mark which module this change belongs to.

All Labels can be queried under issues—Labels, Labels with area/ prefix can be added using the comment "/area" format
5. Cherry-pick code
If it's a bugfix or a feature PR that needs to be merged into a previous release branch, you need to use a script to cherry-pick this PR to the corresponding release branch
# Download and install GitHub's cli tool: https://github.com/github/hub
# macOS: brew install hub
# Debian: sudo apt install hub
# Binary installation: https://github.com/github/hub/releases

# Set GitHub username
# You can put this environment variable in ~/.bashrc, or in ~/.zshrc if using zsh
$ export GITHUB_USER=<your_username>

# Visit this link to add your access token: https://github.com/settings/tokens
# Set GitHub personal token
$ export GITHUB_TOKEN=<your_access_token>

# Use script to automatically cherry-pick PR to release branch
# For example, if there's a submitted PR numbered 17561, merge it to release/3.10
$ ./scripts/cherry_pick_pull.sh upstream/release/3.10 17561

# Cherry pick may have conflicts. When conflicts occur, open another terminal, resolve the conflicts, then input 'y' to submit
$ git add xxx # After resolving conflicts
$ git am --continue
# Return to the terminal executing cherry-pick script and input 'y'
Go to upstream's PR page, and you'll see the automatically generated cherry-pick PR. The PR from the above operation should have the title prefix: Automated cherry pick of #17561, then repeat the PR review process to merge to release
After submitting git code, you need to write commit content. Please refer to the standard: Git Commit Content Standards.
Recommended Configuration for Improving Development Efficiency
The above PR submission process uses many command-line operations, especially when executing the ./scripts/cherry_pick_pull.sh script, many characters need to be entered. And each time this script is executed, the GitHub token needs to be entered. Repeatedly executing these operations can feel like a waste of time.
Below are some configurations and tools that can improve development efficiency on the command line. Please choose configurations according to your actual needs.
Avoid entering GitHub authentication information each time
Every time you push code or execute the cherry_pick_pull.sh script, you need to enter GitHub account and token. You can configure git credential cache to cache the entered authentication information.
# Tells Git to keep your password cached in memory for a particular amount of minutes
$ git config --global credential.helper "cache --timeout=86400"
If you want to achieve automatic GitHub login, you can create a ~/.netrc file and configure GitHub username and token in it.
$ cat ~/.netrc
machine github.com
login $github_user
password $github_token
Improve command repetition input efficiency
In the shell, to repeat input commands, you can use the 'up arrow' or 'Ctrl-p' to input the last executed command.
Another useful feature is to input 'Ctrl-r' to enter the shell's command search mode, then input keywords from previous commands in this mode to search. If it doesn't match, repeatedly press 'Ctrl-r' to continue searching. After finding the desired command, press 'Enter' to repeat the previously entered command. Proper use of 'Ctrl-r' can greatly improve the input efficiency of repeated related commands.
Also recommended is installing a good command-line fuzzy finder tool called fzf. Refer to this document for installation: fzf installation. After installing and configuring this tool, using 'Ctrl-r' will enter a command-line fuzzy search mode, which is better than the shell's built-in 'Ctrl-r' command search.
Also regarding command-line usage philosophy, it's highly recommended to read this article: The Art of Command Line.
Beautify shell
The default shell in Linux and macOS systems is bash. When entering a git code repository, $PS1 doesn't display git branch and other information. You can beautify the system shell using the following methods to provide a more comfortable command-line operation experience.
Below are 2 ways to beautify the shell. Please choose one according to your needs:
-
bash + oh-my-bash approach
- The system comes with bash, so you only need to refer to the oh-my-bash installation documentation for configuration.
-
zsh + ohmyzsh: This approach requires installing zsh and ohmyzsh plugin. zsh and bash are similar shells, but zsh provides richer features. Using it with ohmyzsh plugin is the choice of many developers
- zsh installation reference: Install zsh
- ohmyzsh plugin installation reference: Install ohmyzsh
- Also note that zsh's default configuration file is
~/.zshrc. If you previously added some environment variables in~/.bashrc, you need to migrate them to~/.zshrc.