QGA Usage Introduction
Function Introduction
Use qemu guest agent to operate or view information of running virtual machines.
Installation and Deployment
Different versions of operating systems have different installation methods and startup methods. The following lists some operating system installation methods.
Linux Installation and Startup
# Installation:
Debian     : apt-get install qemu-guest-agent
Ubuntu     : apt-get install qemu-guest-agent
Alpine     : apk add qemu-guest-agent
Arch Linux : pacman -S qemu-guest-agent
Kali Linux : apt-get install qemu-guest-agent
Fedora     :dnf install qemu-guest-agent-2
Raspbian   : apt-get install qemu-guest-agent

# systemd startup or other startup methods:
$ systemctl enable --now qemu-guest-agent

# After startup is complete, you can view qemu-ga process inside the virtual machine
# For example, under centos7, ps can see qemu-ga process started, and disabled the following commands:
$ /usr/bin/qemu-ga --method=virtio-serial --path=/dev/virtio-ports/org.qemu.guest_agent.0 --blacklist=guest-file-open,guest-file-close,guest-file-read,guest-file-write,guest-file-seek,guest-file-flush,guest-exec,guest-exec-status -F/etc/qemu-ga/fsfreeze-hook

# Under centos7, blacklist configuration is under /etc/sysconfig/qemu-ga
$ cat /etc/sysconfig/qemu-ga | grep BLACKLIST_RPC
BLACKLIST_RPC=guest-file-open,guest-file-close,guest-file-read,guest-file-write,guest-file-seek,guest-file-flush,guest-exec,guest-exec-status

# You can also use the following command to view blacklist configuration
$ ps -ef|grep qemu-ga|grep -E "blacklist=|b="
Modify Blacklist Configuration
# Modify blacklist, edit /etc/sysconfig/qemu-ga configuration file, remove needed commands from BLACKLIST_RPC
$ vi /etc/sysconfig/qemu-ga

# After editing is complete, save, restart qemu-ga service:
$ systemctl restart qemu-guest-agent

# View QGA's blacklist again to confirm if configuration is successful
$ ps -ef|grep qemu-ga|grep -E "blacklist=|b="
Windows Installation and Startup
Windows needs to mount virtio-win iso, open the iso to find the guest-agent directory and install the corresponding guest-agent.
Usage Introduction
Executing QGA commands requires ensuring the virtual machine is in running state. If guest-agent is not installed in the virtual machine, executed commands will timeout and fail.
Execute Arbitrary QGA Commands
$ climc server-qga-command  --help
Usage: climc server-qga-command [--help] <ID> <COMMAND>

Qga-Command server

Positional arguments:
    <ID>
        ID or name of the server
    <COMMAND>
        qga command

Optional arguments:
    [--help]
        Print usage and this help message and exit.

# For example, execute guest-info command to get QGA information, including QGA version, QGA supported command information.
# This is a useful command to get QGA support and which operations are disabled in the virtual machine.
$ climc server-qga-command test-server '{"execute": "guest-info"}'
supported_commands:
- enabled: true
  name: guest-sync-delimited
  success-response: true
- enabled: true
  name: guest-sync
  success-response: true
- enabled: true
  name: guest-suspend-ram
  success-response: false
- enabled: true
  name: guest-suspend-hybrid
  success-response: false
- enabled: true
  name: guest-suspend-disk
  success-response: false
- enabled: true
  name: guest-shutdown
  success-response: false
- enabled: true
  name: guest-set-vcpus
  success-response: true
- enabled: true
  name: guest-set-user-password
  success-response: true
- enabled: true
  name: guest-set-time
  success-response: true
- enabled: true
  name: guest-set-memory-blocks
  success-response: true
- enabled: true
  name: guest-ping
  success-response: true
- enabled: true
  name: guest-network-get-interfaces
  success-response: true
- enabled: true
  name: guest-info
  success-response: true
- enabled: true
  name: guest-get-vcpus
  success-response: true
- enabled: true
  name: guest-get-users
  success-response: true
- enabled: true
  name: guest-get-timezone
  success-response: true
- enabled: true
  name: guest-get-time
  success-response: true
- enabled: true
  name: guest-get-osinfo
  success-response: true
- enabled: true
  name: guest-get-memory-blocks
  success-response: true
- enabled: true
  name: guest-get-memory-block-info
  success-response: true
- enabled: true
  name: guest-get-host-name
  success-response: true
- enabled: true
  name: guest-get-fsinfo
  success-response: true
- enabled: true
  name: guest-fstrim
  success-response: true
- enabled: true
  name: guest-fsfreeze-thaw
  success-response: true
- enabled: true
  name: guest-fsfreeze-status
  success-response: true
- enabled: true
  name: guest-fsfreeze-freeze-list
  success-response: true
- enabled: true
  name: guest-fsfreeze-freeze
  success-response: true
- enabled: true
  name: guest-file-write
  success-response: true
- enabled: true
  name: guest-file-seek
  success-response: true
- enabled: true
  name: guest-file-read
  success-response: true
- enabled: true
  name: guest-file-open
  success-response: true
- enabled: true
  name: guest-file-flush
  success-response: true
- enabled: true
  name: guest-file-close
  success-response: true
- enabled: true
  name: guest-exec-status
  success-response: true
- enabled: true
  name: guest-exec
  success-response: true
version: 2.11.1
QGA Set Password
The platform encapsulates QGA set password operations. The platform will validate password strength and encrypt the set password and save it in metadata for subsequent queries.
$ climc server-qga-set-password  --help
Usage: climc server-qga-set-password [--help] <ID> <USERNAME> <PASSWORD>

Qga-Set-Password server

Positional arguments:
    <ID>
        ID or name of the server
    <USERNAME>
        Which user to set password
    <PASSWORD>
        Password content

Optional arguments:
    [--help]
        Print usage and this help message and exit.

# eg:
climc server-qga-set-password test-server root testPassword@1234
QGA Get Virtual Machine Network Card Information
$ climc server-qga-get-network --help
Usage: climc server-qga-get-network [--help] <ID>

Qga-Get-Network server

Positional arguments:
    <ID>
        ID or name of the server

Optional arguments:
    [--help]
        Print usage and this help message and exit.

# eg:
$ climc server-qga-get-network test-server
- hardware-address: "00:00:00:00:00:00"
  ip-addresses:
  - ip-address: 127.0.0.1
    ip-address-type: ipv4
    prefix: 8
  - ip-address: ::1
    ip-address-type: ipv6
    prefix: 128
  name: lo
  statistics:
    rx-bytes: 0
    rx-dropped: 0
    rx-errs: 0
    rx-packets: 0
    tx-bytes: 0
    tx-dropped: 0
    tx-errs: 0
    tx-packets: 0
- hardware-address: 00:22:c8:10:5a:1c
  ip-addresses:
  - ip-address: 192.168.100.45
    ip-address-type: ipv4
    prefix: 24
  - ip-address: fe80::222:c8ff:fe10:5a1c
    ip-address-type: ipv6
    prefix: 64
  name: eth0
  statistics:
    rx-bytes: 6703
    rx-dropped: 0
    rx-errs: 0
    rx-packets: 62
    tx-bytes: 9460
    tx-dropped: 0
    tx-errs: 0
    tx-packets: 65
QGA Modify Running Virtual Machine Network Address
Configuration Requirements
- QGA version ≥ 2.11.1
- Support guest-ping, guest-network-get-interfaces, guest-get-osinfo, guest-exec commands
Version Number View
QGA version number can be viewed through guest-info command
Blacklist Configuration
Manually installed QGA's default blacklist is empty, meaning all commands can be used. No additional configuration is needed, skip this step. QGA that comes with centos7 and later systems has already processed the blacklist by default when deploying virtual machines. If processing was not successful, you can modify the blacklist according to Modify Blacklist Configuration.
Usage Method
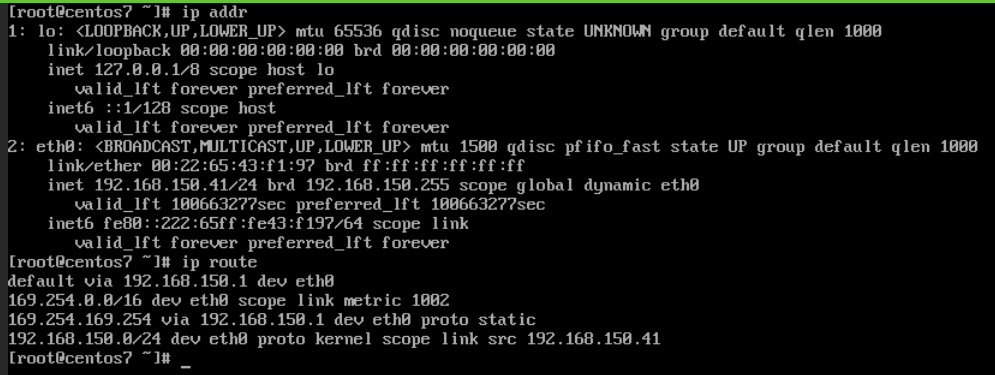
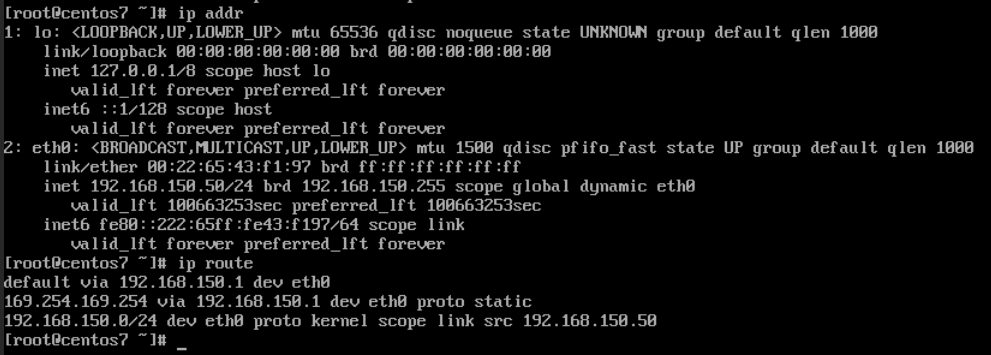
Here using centos7 as an example, introduce modifying running virtual machine's IP address. The virtual machine's previous network address and routing are as shown in the figure:
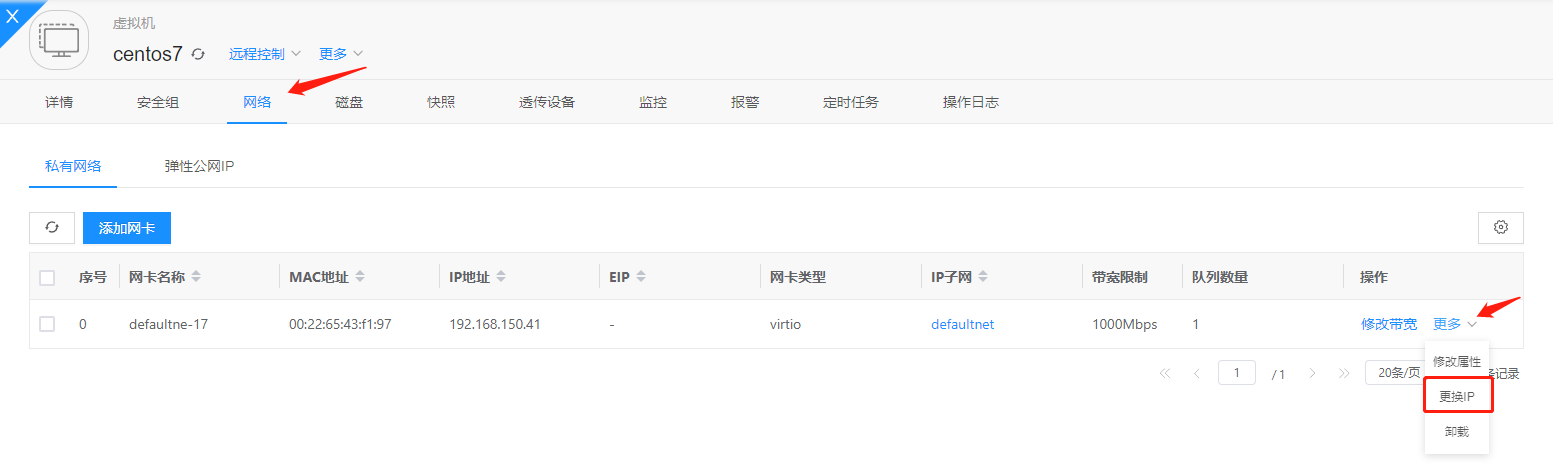
On the virtual machine management page, select Network—More—Change IP to modify the virtual machine's IP address:
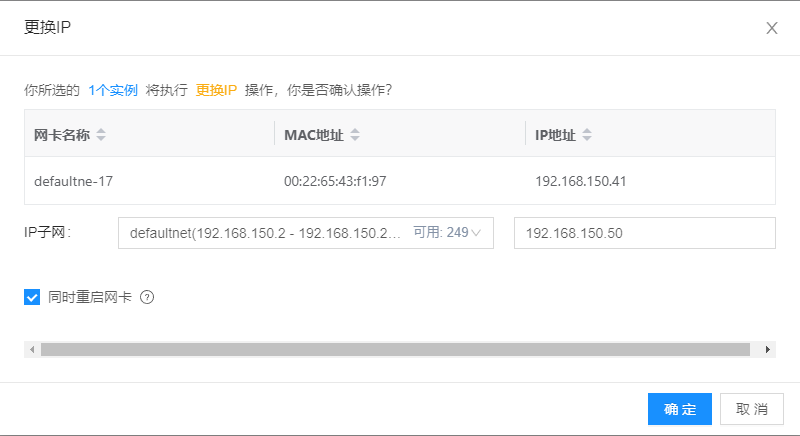
Specify the IP address that needs to be modified. Here you need to specify an IP address within the subnet. Because you need to modify the virtual machine's IP in running state, you need to check the restart network card button (checked by default)
After clicking OK, the virtual machine enters configuration phase. Wait for the virtual machine status to become running, indicating IP address modification is successful
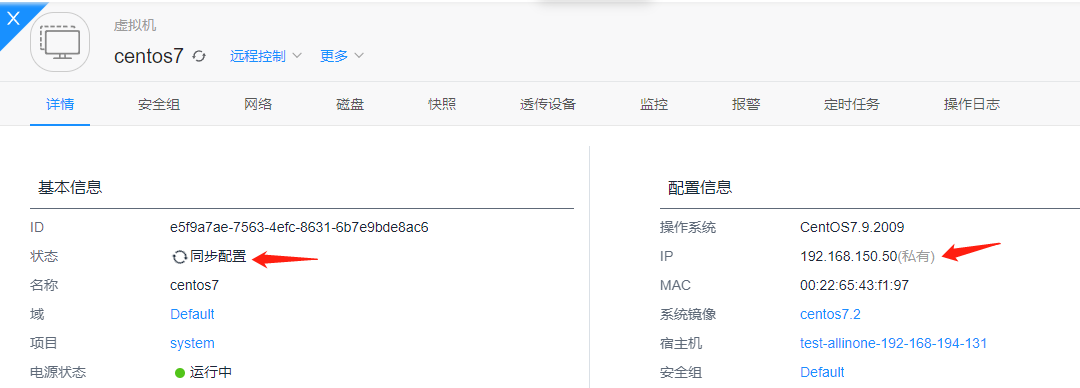
The virtual machine's IP address and routing table have both been modified
If virtual machine uses QGA to modify network configuration and fails, it will call ansible to modify network configuration
Considerations
- When using QGA to modify network configuration, the first time may fail, but QGA status is actually normal. Therefore, after the first execution error, it will automatically execute a second time. The second execution result is the final execution result.
- Routing after modifying network configuration will become static routing
- Windows execution time will be relatively longer
- QGA network configuration modification failure may be because QGA is not installed, QGA version is too low, or QGA execution failed. Need to troubleshoot step by step