Setting Up Development Environment
Introduction to how to set up a development environment, compile and deploy related components.
- Services run in containers in Kubernetes (K8S) clusters, so development and debugging require deploying a Kubernetes cluster
- Backend services are all written in Golang, so Golang needs to be installed in the development environment
- To publish developed services to Kubernetes clusters, related services need to be built into docker images locally
- Development environments are best on Linux, where installing docker and compiling source code is very convenient
Next, we'll introduce how to set up a development environment.
Deploy Platform Services
Before starting development, please refer to Private Cloud Quick Installation to deploy platform services. All our services run in containers in Kubernetes clusters, so we need to set up our services first and use this environment as our development environment.
It is recommended to use a separate CentOS 7 virtual machine with configuration (at least 4C8G + 100G system disk) to install and deploy our services.
Install Go
Golang version requires 1.18 or higher
For installing Golang environment, please refer to: Install Golang
Install and Configure Docker
Because services need to be packaged into container images, docker needs to be installed first. The docker version here needs to be docker-ce 19.03 or higher.
Below are installation methods for different operating systems and Linux distributions. It is still recommended that the development environment be Linux.
Install Docker
Refer to official documentation: https://docs.docker.com/get-docker/.
Configure Docker
Subsequent code compilation and packaging use docker buildx functionality. The docker daemon needs to enable experimental features for compiling images of different architectures. Refer to docker's official Building multi-platform images documentation.
# Enable experimental features in docker daemon configuration
$ cat /etc/docker/daemon.json
{
  "experimental": true
}

# Restart docker service
$ systemctl restart docker

# Enable binfmt_misc feature for qemu emulation to compile images of other architectures
# Detailed description reference: https://docs.docker.com/build/building/multi-platform/#building-multi-platform-images
$ docker run --privileged --rm tonistiigi/binfmt --install all

# Create buildx context
$ docker buildx create --use --name build --node build --driver-opt network=host
Compile cloudpods Components
Fork Repository
Visit https://github.com/yunionio/cloudpods and fork the repository to your own GitHub account.
Clone Source Code
Before git clone, ensure GOPATH and other environment variables are set, then clone your forked repository
$ git clone https://github.com/<your_name>/cloudpods $GOPATH/src/yunion.io/x/cloudpods
$ cd $GOPATH/src/yunion.io/x/cloudpods
$ git remote add upstream https://github.com/yunionio/cloudpods
Binary Compilation
Compilation directly calls the go compiler to compile binaries locally. The corresponding Makefile rule is make cmd/%, where % corresponds to the component name in the cmd directory.
# All components are stored in the cmd directory:
$ ls cmd
...
ansibleserver    climc      glance      keystone  qcloudcli     ucloudcli
awscli           cloudir    host        lbagent   region        webconsole

# You can compile specified components under cmd, for example: compile climc and region components
$ make cmd/climc cmd/region

# Compiled binaries will be directly in the _output/bin directory, view compiled binary files
$ ls _output/bin
climc region

# Compile all components
$ make
Docker Image Compilation and Upload
Usually our development process is: after writing code, package the corresponding service into a docker image, then publish it to our own Kubernetes cluster for testing. Below explains how to generate docker images.
Generated docker images need to be uploaded to an image repository. Here we use Aliyun's container image service as an example. For example, I created a public namespace on aliyun, and the repository address is: registry.cn-beijing.aliyuncs.com/zexi.
# Log in to the image repository locally, here use your own image repository
# You need to log in with your aliyun account first, then container image uploads won't require passwords
$ docker login registry.cn-beijing.aliyuncs.com/zexi
......
Login Succeeded
After preparing the image repository, you can start packaging and uploading images. These steps are executed through the Makefile's image rule.
Here are the following environment variables used to control image creation content:
- REGISTRY: Corresponds to the repository for image upload
- VERSION: Used to generate image tag
- ARCH: Corresponds to docker image arch, can be set to 'arm64' or 'all'
- arm64: Compile, package and create arm64 docker image
- all: Compile, package and create amd64 and arm64 images
- DEBUG: If set to true, packaging steps will be displayed
Based on the REGISTRY and VERSION environment variables, image addresses for each component will be generated in the format:
$(REGISTRY)/$(component):$VERSION
# Compile and create docker image for region service
# Then upload to registry.cn-beijing.aliyuncs.com/zexi/region:dev
$ VERSION=dev REGISTRY=registry.cn-beijing.aliyuncs.com/zexi make image region

# Compile multiple components and upload. The following command will upload the following components
# - registry.cn-beijing.aliyuncs.com/zexi/ansibleserver:dev
# - registry.cn-beijing.aliyuncs.com/zexi/apigateway:dev
# - registry.cn-beijing.aliyuncs.com/zexi/region:dev
$ VERSION=dev REGISTRY=registry.cn-beijing.aliyuncs.com/zexi make image \
     ansibleserver apigateway region

# Compile arm64 image. If ARCH=arm64 is specified, '-arm64' suffix will be added to the corresponding image
# - registry.cn-beijing.aliyuncs.com/yunionio/scheduler:dev-arm64
$ VERSION=dev REGISTRY=registry.cn-beijing.aliyuncs.com/zexi ARCH=arm64 make image scheduler

# Compile amd64 + arm64 images. Specify ARCH=all, no suffix will be added here, the image name will contain versions of both architectures
# - registry.cn-beijing.aliyuncs.com/yunionio/cloudid:dev
$ VERSION=dev REGISTRY=registry.cn-beijing.aliyuncs.com/zexi ARCH=all make image cloudid

# Compile multiple multi-architecture components simultaneously and upload
$ VERSION=dev ARCH=all REGISTRY=registry.cn-beijing.aliyuncs.com/zexi make image \
     ansibleserver apigateway baremetal-agent climc cloudevent \
     cloudnet devtool esxi-agent glance host host-deployer keystone \
     logger notify region s3gateway scheduler webconsole yunionconf \
     vpcagent monitor region-dns cloudid
Development and Debugging
The usual steps for development and debugging are: after writing code, use the previously mentioned make image rule to package and upload the docker image of the corresponding service, then publish the image to your own Kubernetes cluster for testing.
Publish Image to Kubernetes Cluster
Backend services all run in Kubernetes' onecloud namespace. You can view corresponding Kubernetes resources using the following commands. Our services use the following Kubernetes resources for service management.
- deployment: Manages most services. These services will start on any Kubernetes master node, for example: region, apigateway services, etc.
- daemonset: Manages services that need to start on each Kubernetes node, for example: host service (private cloud compute node service)
You also need to briefly understand Kubernetes pod resources. Pods are collections of actually running containers and are the smallest unit for running containerized services in Kubernetes. A pod can run multiple containers, and each container has its own corresponding image.
For other Kubernetes resource introductions, refer to the official Workload Introduction.
Below are commands using kubectl (Kubernetes command-line tool) to view resources corresponding to each service:
# View deployments under onecloud namespace
$ kubectl -n onecloud get deployment

# View daemonsets under onecloud namespace
$ kubectl -n onecloud get daemonset

# View pods under onecloud namespace
$ kubectl -n onecloud get pod
After having a general understanding of Kubernetes resources, the next step is to publish the service image just packaged to the corresponding service in the cluster. Here we use the region service as an example.
# First compile and package region image locally
# Will generate image on aliyun: registry.cn-beijing.aliyuncs.com/zexi/region:dev-test
$ VERSION=dev-test REGISTRY=registry.cn-beijing.aliyuncs.com/zexi make image region
# Find the kubernetes resource name corresponding to region service
$ kubectl get deployment -n onecloud | grep region
default-region 1/1 1 1 90d
# Update the image property in default-region deployment resource
# Then the corresponding default-region pod will automatically pull the image and restart
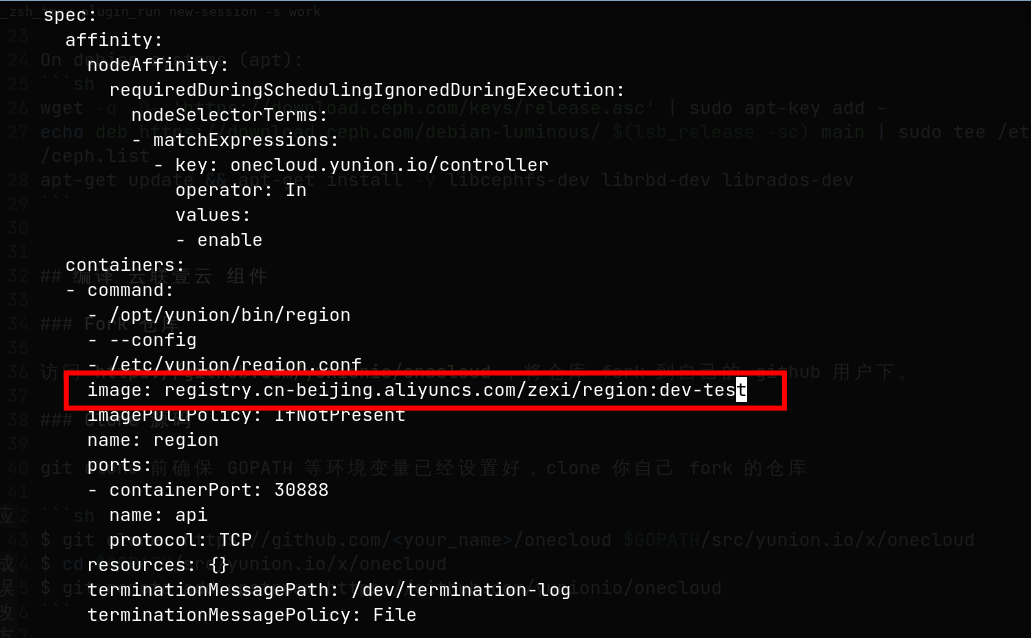
$ kubectl -n onecloud edit deployment default-region
After using the kubectl -n onecloud edit deployment default-region command, you enter the step of editing resource YAML properties. You only need to modify the image property to the corresponding aliyun image address. Screenshot as follows:
After modifying and saving, it will pull the specified image to create a new region pod and delete the old one. You can view the current status of the region pod again.

View Service Output Logs
You can use the kubectl log command to view output logs of corresponding pods. Here we use the region pod just published as an example.
# First find the pod corresponding to region service
$ kubectl get pods -n onecloud | grep region
default-region-6bd8c54d68-sq4gq                     1/1     Running            0          101m

# View logs
$ kubectl logs -n onecloud default-region-6bd8c54d68-sq4gq

# Redirect logs to file /tmp/region.log
$ kubectl logs -n onecloud default-region-6bd8c54d68-sq4gq > /tmp/region.log

# Stream view logs, similar to 'tail -f'
$ kubectl logs -n onecloud default-region-6bd8c54d68-sq4gq -f

# View logs from 5 minutes ago
$ kubectl logs -n onecloud default-region-6bd8c54d68-sq4gq -f --since 5m
Install and Configure climc
climc is a command-line tool for accessing the backend. You can use this tool to send API requests to various backend services. In daily development, this command-line tool is used for function verification and debugging. Installation and usage methods are referenced below.
Local Source Code Compilation and Installation of climc
# Compile climc
$ make cmd/climc

# If compiling on macOS M series chip machines, need to add the following environment variables
$ GOARCH=arm64 GOOS=darwin make cmd/climc

# After compilation is complete, climc is in the _output/bin directory
$ ls -alh _output/bin/climc
-rwxr-xr-x 1 lzx lzx 25M Jul 15 17:10 _output/bin/climc
Afterwards, you can place the compiled climc in the corresponding directory according to your needs, or directly write an alias pointing to $(pwd)/_output/bin/climc.
climc Authentication Configuration
Reference documentation: climc Authentication Configuration
climc Usage Introduction
Reference documentation: climc Usage
FAQ
1. Development environment is windows or macOS, how to develop?
Because our services will eventually run in K8S clusters built on CentOS 7, daily development and packaging are generally done in CentOS 7.
If the development environment is windows, you can write code in windows, then create a CentOS 7 virtual machine, set up the development environment in the virtual machine, and after writing code, use synchronization tools like rsync to incrementally copy modified code to the virtual machine, then proceed with packaging, publishing and other processes.
For macOS on Mac, it's similar. You can use the same process as windows development. But the difference between development in macOS and Linux is not very large. After installing corresponding command-line tools and docker in macOS, you can directly use make image related rules to package and generate docker images.
2. Local debugging startup of region service reports the following error

Use climc service-config-edit region2 to edit region service configuration and modify parameters:
    fetch_etcd_service_info_and_use_etcd_lock: false
    enable_host_health_check: false
3. Running make cmd/host directly locally will result in ceph dependency errors
The host component is a key component for managing virtual machines in private clouds. It depends on cephfs, rbd and rados related libraries. If compiling directly locally, corresponding dependencies need to be installed. Operations are as follows:
- CentOS 7
- Ubuntu 20.04
On rpm based systems (dnf, yum, etc):
sudo rpm --import https://download.ceph.com/keys/release.asc
sudo yum install -y https://download.ceph.com/rpm-luminous/el7/noarch/ceph-release-1-1.el7.noarch.rpm
sudo yum install -y https://dl.fedoraproject.org/pub/epel/epel-release-latest-7.noarch.rpm
sudo yum install -y libcephfs-devel librbd-devel librados-devel
On debian systems (apt):
wget -q -O- 'https://download.ceph.com/keys/release.asc' | sudo apt-key add -
echo deb https://download.ceph.com/debian-luminous/ $(lsb_release -sc) main | sudo tee /etc/apt/sources.list.d/ceph.list
apt-get update && apt-get install -y libcephfs-dev librbd-dev librados-dev
4. How to update the code in the vendor directory of the cloudpods backend code repository?
Third-party code that cloupods depends on is statically maintained in the vendor directory. After updating code in dependency repositories like cloudmux, enter the cloudpods repository and execute the following command to update vendor code:
make mod
5. How to resolve vendor code conflicts that appear during cherrypick?
First resolve go.mod and go.sum code conflicts, then execute make mod to refresh code in vendor. Finally commit all changes in go.mod, go.sum and vendor.